rice milk »» Wonderland Kitchen
Search results for

rice milk

DIY Pumpkin (Pie) Seed Butter

DIY Pumpkin (Pie) Seed Butter

Between making nut butters and non-dairy milks, everywhere I look I now see how a motor and some pantry staples can result in easy-to-whip-up versions of commercial products: tahini, sunflower butter, nut/grain/coconut milks. This is how I found myself standing in the bulk aisle considering what else might make for a tasty spread or beverage. I spied the pumpkin seeds and wondered, hey, would pumpkin seed butter taste good? Is that a thing already? (It is, though it is a pricey and not necessarily readily available option.)

In a general grocery store situation, the pepitas may already be salted and roasted, so no need to add additional salt unless it’s your preference. If you have raw hauled seeds, you can toast them in the oven before processing. Of course, some people are looking to keep their diet raw, and you can use raw seeds if that suits your nutritional preferences best. However, roasting will deliver a richer flavor.

Due to the high fat content of the seeds, they can easily go rancid. Take care to purchase fresh seeds and then keep them in a sealed bag or airtight container. Seeds can be stored in the refrigerator or freezer for a longer shelf life.

January’s unrelenting grey drizzle has me in the mood for something warm and comforting, so I have seasoned this recipe with homemade pumpkin pie spice and maple syrup. You may certainly omit or reduce any spices you don’t like, and use honey or another sweetener instead or omit these things completely.

I was surprised to read comments along the lines of, “an acquired taste, but I’ll eat it because it’s healthy,” attached to some commercial versions of pumpkin seed butter. Maybe it’s because I soup mine up with a touch of sweetener and spice, but I could eat the whole jar with a spoon if no one was looking. And if there are nut allergy concerns, you may find this to be a great tasting and safe alternative (though check with your healthcare professional first).

DIY Pumpkin (Pie) Seed Butter: Ingredients

DIY Pumpkin (Pie) Seed Butter
makes approximately 2 cups

Note: If you have raw hauled seeds, toast them in a 350° oven, stirring occasionally, for ten minutes or until fragrant, popping, and lightly browned. Oiling them is not necessary. Add a 1/4 teaspoon salt (or to taste) to the recipe.

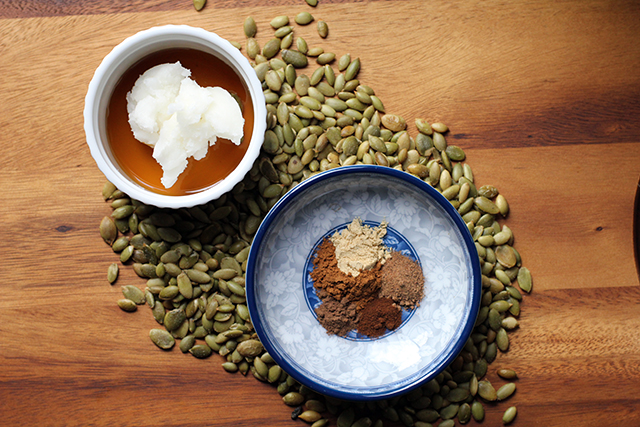
3 cups roasted and salted pepitas
1/2 teaspoon ground cinnamon
1/4 teaspoon ground nutmeg
1/4 teaspoon ground ginger
1/8 teaspoon ground allspice
1/8 teaspoon ground cloves
2 teaspoons maple syrup, or to taste
2 tablespoons neutral oil of your choice, plus additional as needed

Combine all ingredients in the bowl of a food processor and process, stopping occasionally to scrap down sides, until desired consistency is reached. Add more oil by the tablespoonful as needed if the butter is too dry.

Scoop butter into a container with a tight-fitting lid and store in the refrigerator.

*

This post was shared in a blog hop hosted by the awesome Frugal Days, Sustainable Ways. The site offers tons of inspiring DIY ideas, so definitely check it out!

This recipe and post were created for my “DIY vs. Buy” column on Serious Eats.

Real Deal: DIY Greek Yogurt

greek-yogurt-finished-two

I am not generally a “doing the math” kind of person. As a result, I end up economizing in weird ways. I’ll stand in a grocery store aisle agonizing over the cost/benefit of something based on price and ingredients and brand, maybe saving a dollar here with a bulk buy or spending a dollar there to get the organic option. Later that night, however, I won’t think twice about going out to dinner with my husband, making the utility of the entire exercise somewhat questionable.

When it comes to the Greek yogurt consumed in our house, however, I finally did all the math for my latest Serious Eats column, a process which left me convinced I no longer knew how to divide. I was shocked by what kind of savings I might manage in a given year if we could get off the little cups with the parchment paper tops and start making it all at home. But I was going to need a much more streamlined process than my yogurt-making appliance filled with little glass jars would allow, so the research began.

Producing yogurt at home may not be quite as simple as making ice cubes, but it’s not much more complicated than measuring liquid into containers and letting it reach or hold certain temperatures. Ultimately, if you can stir and read a thermometer, you have all the skill needed to culture your own. The process takes a lot of hands off time, however, so if you’re more accustomed to the immediate gratification of cookie baking, this may take some getting used to.

DIY Greek Yogurt: strained and portioned

A few things to consider before you begin:

  • Both the milk and the starter you select will impact the taste and consistency of the final product, and you will likely need to experiment some before you hit on your ideal ingredients. If you’re using fresh yogurt as your starter rather than freeze-dried, be sure to use a plain variety that contains live and active cultures.
  • There is more than one way to incubate at 110°F—from a simple thermos to a special appliance specific to yogurt making. I found the method below (which I first learned about here) to be both simple and consistent, but you may want to experiment and use the process you find most efficient.
  • A useful trick I picked up from Alana Chernila’s The Homemade Pantry is to incubate a small portion of the milk and starter mixture in a 1/2-pint jar alongside the two filled quart jars. Reserve this smaller portion to culture your next batch of yogurt. If using the small cooler method outlined below, you can keep this smaller jar above the water line by setting it on top of a narrow, empty 1/2-pint jar.

DIY Greek Yogurt: ingredients

DIY Greek Yogurt
8 cups milk
4 tablespoons plain yogurt with live and active cultures or freeze-dried yogurt starter

DIY Greek Yogurt: hot and cold

In a heavy-bottomed pot over medium heat, bring milk to 180°F, stirring regularly to prevent scorching.

Once milk has reached temperature, allow it to cool to 110°F (place pot in an ice bath to speed cooling, if desired). When milk has cooled, add yogurt to the pot and whisk thoroughly to combine.

DIY Greek Yogurt: incubation

Pour milk and starter mixture into two quart-sized jars (and smaller 1/2-pint, if using) and screw on lids. Place them in a small insulated cooler and fill with 120°F water until jars are submerged nearly up to their lids. Close cooler and leave in a draft-free, undisturbed place for six hours or until desired tartness is achieved.

When incubation is complete, remove jars from water bath and place in refrigerator for at least six hours to halt culturing and set yogurt.

DIY Greek Yogurt: straining

At this point, yogurt may be eaten, but to achieve a Greek-style consistency, it will need to be strained. Place a fine mesh strainer over a bowl and line it with two layers of cheese cloth. Spoon yogurt into lined strainer and allow to drain for two hours or until desired thickness is achieved.

Transfer yogurt to a storage container and refrigerate until needed. Remaining leftover whey (approximately two cups) may be reserved for another use if desired.

Pretty in Pink Week: Cold Summer Beet Soup

soup_top

Due to market produce selection, it’s shaping up to be something of a pretty in pink week here in Wonderland. Beets…strawberries…grapefruit juice…purple potatoes (yeah, but close enough relations?). Even before I did the shopping, I was already gazing into the refrigerator to assess the inventory and dreaming in Pantones.

What I already had on hand due to the previous week’s cooking: three perfectly roasted beets; half a bottle of buttermilk; one cup of thick yogurt; one bunch of spring onions; a cucumber and some dill; plus a few remaining pickled ramps floating around in jar of brine that was so sweet and tangy and delicious it would be criminal to not put it to some use.

Cold Summer Beet Soup

I mention this because as soon as I saw the Šaltibarščiai soup recipe in Canning for a New Generation, I started in on the Googling and realized that I wouldn’t be able to make a soup a Lithuanian Bubby would recognize, but I might just come up with a tasty “inspired by” summer dish. Plan formed, I went to work with my knife.

Cold Summer Beet Soup
heavily inspired by Canning for a New Generation, internet research, and the contents of my refrigerator

1 1/2 cups buttermilk (or kefir)
1 1/2 cups vegetable broth
1 cup strained or Greek yogurt
1 cucumber, seeded and diced into small cubes
2 large cooked beets, peeled and diced into small cubes
1 spring onion, finely sliced and chopped a few times
2-3 T sweet pickle brine or rice vinegar (to taste)
2 T dill, finely chopped
1 tsp salt
black pepper

Really, once you’ve completed the knife work required (as indicated above), you’re pretty much done. Reserve some of the beet and cucumber pieces for garnish, if desired. Place all remaining prepared ingredients in a large bowl and stir to combine. Adjust seasonings to taste and serve.

Cold Summer Beet Soup

Soup can be made in advance and kept chilled. Flavors meld, but also be forewarned that the beets will continue to bleed into the broth. By dinner last night, Brian was a little freaked out by the “Barbie corvette” tone the evening’s soup course had taken on.

Homesick for Life on the Road: Mutter Paneer

mutterpaneer

Making paneer reminds me of the brief time I spent in Nepal. Not of the streets I walked and the music I was there to study, but the many quiet hours I spent in the kitchen with the family who had taken me in, cooking alongside the “sister” who had adopted me into her household, welcoming me with an infectious smile and a cup of tea. I miss watching Hindi soap operas with her to this day, and I didn’t understand of word of them (so that’s saying something).

Our kitchen corner (left) and a view down onto wedding feast preparations (right). When cooking for 50, I guess it's easier to work outside.

Aside from your basic college survival budget cooking (lots of rice and beans and steamed carrots, in my case) I was not all that sophisticated when it came to food prep at that point in my life, and it showed painfully in this sparely equipped, two-burner kitchen. By the time I left a few months later, however, I could make curries and dals and chaats and momos…well, if not like a pro, then at least like an over-enthused novice. Paneer was another of these new delicacies, the construction of which was introduced to me in Kathmandu, though I’ve only made it a few times more in the ensuing decade.

On my last trip to NYC, however, I grabbed a bite at a little Indian lunch counter where the food was as divine as the shop was covert. The mutter paneer spoke to me through the glass. It was so tasty that once I got home I found myself fixated on the taste of it and the desire to revisit that simple cheese making process. It got me a little homesick for life on the road (if that’s possible), but the resulting dish itself was so tasty I consoled myself with quite a few spoonfuls before the paratha was even off the griddle (no recipe for those here, because I cheat and buy frozen).

*The lovely aluminum serving dish pictured above is from Don Drumm’s studio.

For the paneer

1/2 gallon whole milk
3-5 T lemon juice (best to have more than enough squeezed and ready before you start)
1 piece fine cheesecloth

In a heavy-bottomed pot, bring the milk up to a gentle boil. Add lemon juice, a tablespoon at a time, stirring after each addition, until milk separates. Remove from heat.

Line a sieve with the cheesecloth and pour the curds and whey through to separate them. Rise the curds under cold water then drain well, gathering the curds together into a ball. Twist the cheesecloth together and gently squeeze to remove some of the excess water, then leave to hang for 30 minutes. To further press the curds into a more solid cheese that can be cubed and fried for dishes such as the one below, twist the cheesecloth closed gently but securely and place on a counter or cutting board with a weight on top to further press out liquid (I use my marble cheese board). Check the cheese after an hour and continue pressing until it has reached the desired texture (if it becomes too dry it will crumble, so take care). Use right away or wrap well and refrigerate.

For more beautiful instructions than mine, see this tutorial.

For the mutter paneer
Adapted from Manjula’s Kitchen

3 T olive oil, plus more as needed
paneer (see recipe above), cubed

1 T ginger, chopped
2 cups canned tomatoes
1 tsp. cumin seeds
2 bay leaves
1/2 inch of cinnamon stick
Pinch of asafetida

Here I must admit that I went a little cross-culture crazy and omitted the remaining spices, instead using a few spoonfuls of that amazingly delicious berbere paste I made a little while ago. However, recognizing that you probably won’t have that on hand, the original recipe indicates:

1 T coriander powder
1/2 tsp. turmeric
1/2 tsp. chili powder
1/2 tsp. paprika
1 tsp. salt or to taste

16 oz. frozen peas

Heat enough of the olive oil to thickly coat the bottom of your skillet and fry the paneer cubes. When they are golden brown, spoon them out onto a plate lined with paper towels to soak up excess oil and set aside.

Puree the tomatoes and ginger together.

Add a little more oil to your skillet if needed and, when hot once again, add the cumin seeds, bay leaves, cinnamon stick, and asafetida. Stir and fry for a few seconds, then pour in the tomato and ginger mixture, plus remaining spices. Once the sauce begins to sputter, reduce the heat and allow to reduce a bit.

Add peas, stirring to combine. Cover and continue cooking until peas are tender. Toss in the paneer and heat the dish through, adding salt as needed.

Serve with flatbread or over rice.

Cozy Up (Vegetable Pot Pie Edition)

pie_top

My oven and I are at war.

Last week, I thought I was losing my mind. I would check on some item baking in my oven, and discover that I had somehow shut the appliance off entirely only half way through the cooking time. This is actually not that difficult to do if you’re using the timer and you punch “cancel” instead of “off” to silence it when it rings. Just as my frustration with myself was about to boil over, however, I saw it happen–a click, a blank screen, and the oven turned itself off. I wasn’t exactly pleased by this but, reassured that my sanity hadn’t walked out on me, I called a repair service> and waited for my house call.

As these things go, four days later when the super-amiable repair duo showed up, the oven worked perfectly–bake, broil, not a single glitch. Nice to avoid the pricey circuit board replacement, but still. Really? I was advised to bake some brownies and call them on Monday if the oven went berserk again.

The suddenly crisp temperatures did make me want to bake something warm and comforting for dinner, so I decided to test the oven and my luck with a roasted root vegetable pot pie I like a lot (adapted from the Poor Girl Gourmet). And so I spent an uneventful afternoon in the kitchen. An hour of roasting and 40 minutes of baking and not a single oven malfunction. I got a beautiful pie out of the deal, so not a bad day, I suppose. But I wish I could have figured it all out for myself before I paid $65 just to have two strangers poke around under my oven and retrieve a pile of lost cat toys.

Roasted Root Vegetable Pot Pie
Adapted from the Poor Girl Gourmet

For the roasting tray:

3 T olive oil
2 lbs peeled and cubed root vegetables of your choice (I used turnips, carrots, potatoes and a sweet potato)
1 head of garlic, exterior layers of skin peeled away and top of head removed to expose cloves
salt
pepper
thyme

Heat the over to 375˚F.

Place the prepared garlic bulb on a sheet of foil and pour a teaspoon or so of olive oil over top. Add a pinch of salt and pepper, and wrap up into a packet.
Place the prepared root vegetables in a bowl and toss with olive oil, salt, pepper, and thyme to coat. Pour them out onto a foil-lined baking sheet and spread out in a single layer.
Add garlic packet to the baking sheet and roast all vegetables for 45 minutes, stirring once or twice for even browning.

For the top crust:

1 cup all-purpose flour
1/2 cup whole wheat flour
1/2 teaspoons salt
1/2 teaspoon baking powder
1/4 cup cold vegetable shortening
1/2 stick cold unsalted butter
1/4 cup ice water, plus more as needed

While the vegetables are roasting, prepare the pie crust. You’re welcome to use your favorite crust, of course, but I love the poof you get out of this version. Mix flours, salt, and baking powder in a bowl. Cut in butter and shortening, and then mix in just enough water to pull dry ingredients together. Flatten dough into a disc and wrap in plastic wrap. Refrigerate for at least 30 minutes before rolling out.

On the stove top:

1 T olive oil
1 T unsalted butter
1 medium onion, peeled and diced
1 T wholegrain mustard
1.5 T all-purpose flour
1 cup vegetable broth
1 bunch Swiss chard or dark leafy green of choice

Heat oil and butter in a skillet and sauté onion until softened and translucent. Add mustard and flour and cook for a minute or two, stirring often. Then add vegetable broth and mix well, scraping the bottom of the pan thoroughly. Once the sauce has thickened (about 10 minutes), pile the greens on top of the cooking gravy, cover, and allow them to wilt for a few minutes. Stir occasionally until greens have cooked down. Stir in the roasted root vegetables, then pour the entire mixture into a pie plate. Remove the garlic cloves from the roasted bulb and distribute them evenly around the filling.

For the crust glaze:

1 egg yolk
1 T milk

Don’t worry, you’re almost done! Roll out the pastry crust and lay it over the filling, adding whatever decorative touches you like, and then brush the top with the egg yolk/milk mixture. Place pie plate on the baking sheet and slide it back into the 375˚F oven. Bake for 40 minutes, until pie is golden. Remove from the oven and allow to rest for 15 minutes before slicing.

Light a fire, pick out a movie, open a nice Sangiovese, and enjoy!

Three Cubed: B&O Fresh Fruit Shortcake

bis_top

The Book: Dining on the B&O: Recipes and Sidelights from a Bygone Age

(2009, though the collection gathers recipes from instructions published decades earlier)

And now for a bite of dessert.

Kate conceptualized this Three Cubed cooking project as a way to expand our horizons and blow our minds, and so far it seems to be working! By forcing our spatulas a bit and getting us to try a few of the recipes we usually just skip over, we’re bound to be making things we have already decided won’t work out well or don’t meet our usual tastes, so there is a kind of odd dissonance at play in the kitchen during these experiments.

I had already been having an arms-length affair with my copy of Dining on the B&O. As I read through the special notes on everything from the salad dressings to the service style, I enjoyed imagining the staff in their efforts to pull decent dining out of a small, rocking and rolling kitchen (long before the microwaved chemistry we call travel dining today)–perhaps for Cary Grant, with his Gibson and his beautiful blonde, dining a la train car.

That all said, I never felt motivated to actually cook anything from it.

So this is exactly where the Three Points Baltimore branch decided to kick this project off. The B&O cookbook isn’t long, so I had to back up to page 127, where I was sad to see not only a dessert (we are not a dessert-eating household–birthday cakes and chocolate cookies are often, criminally, left to go stale on our countertops) but also one that required shortcakes. Images of spending hours producing dozens of cakes that no one would ever eat stomped on my enthusiasm somewhat, but I was committed to giving it a go.

Crisco was purchased (lard, it is suggested, produces a better flavor and I was sorely tempted to go all out in the name of nostalgia, but just couldn’t do it in the end). Once the measuring was actually in process, however, I realized that I was only going to end up with four petite biscuits and that portion of the production would take only about 10 minutes to assemble and 15 minutes to bake off. Plus, consisting of just a bit of fat, milk, flour, salt, and baking powder, the biscuits would end up a rather all-purpose addition to my general culinary skills, such as they are. I ate one plain as soon as they were out of the oven and had to resist a strong urge to eat all the rest, flaky and warm and temptingly sans sweet fruit.

Having no peaches or strawberries at hand, but a whole container of freshly cubed champagne mangoes in the fridge, I confess that I cheated on the fruit portion of this assignment. I whipped up some cream, assembled according the careful “chef’s notes” instruction as far as portion size was concerned (“tab” diners vs. a la carte changed the amount/price), snapped a few pics and called the resulting tower tasty. The only thing sweeter would have been to look out the window and see the station lights of some unknown city promising fresh adventure up ahead.