rice milk »» Wonderland Kitchen
Search results for

rice milk

DIY Rice Milk

DIY Rice Milk

When my DIY column over at Serious Eats was still just an idea, my soon-to-be editor encouraged me to go exploring. Sure, homemade soups and baked goods are generally tastier than their store-bought cousins, but what about the stuff it might not occur to many home cooks to make from scratch? As a result, I now find myself wandering the aisles of my local grocery store and pausing to wonder: Hey, could I make that?

Obviously, I’m not alone in this instinct: the internet is filled with inventive cooks trying to hack all kinds of products. Some are motivated by health issues, others by political or environmental concerns. Generally it’s a mashup of all of the above. I enjoy the process, so I make what I can and still buy (without guilt) what I don’t have the time, energy, or ability to produce. And while I can’t walk things all the way back to growing my own soybeans or pasturing a cow on my city lot, it’s been excitingly educational to see how far I can get. Case in point: after the post on DIY-ing Greek yogurt, I had a reader request a non-dairy version of the same treat. I thought I’d get to work on that one this week, but once I started thinking about how I would approach it, I decided I might as well begin by making some non-dairy milks. (Also, I just got a real blender that needed to earn its counter space.)

Of all the many milk alternatives out there, I don’t think I’ll be using rice milk to make yogurt, but this does seem like the one with the most financial bang for the DIY effort. Here’s what I learned:

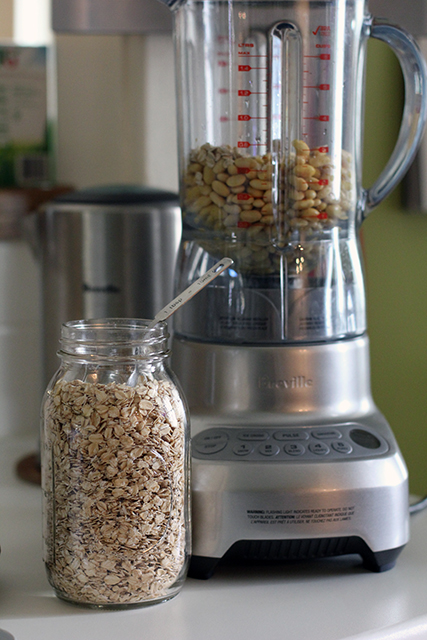
Soaked vs Leftover vs Over Cooked: If my internet research can be trusted, the most popular way to make rice milk at home seems to be to boil the grains into oblivion with many times the amount of water you would normally use. I’m the odd woman out here because I found this milk to have an unpleasant mouth feel, gummy and almost slimy, even when diluted to match the consistency of the commercial version. (I used a plain version of Rice Dream as my control.) I also tried cooking a 1/2-cup of rice traditionally and then blitzing that in the blender with cold water and straining. That was closer to what I was going for, but still not quite it.

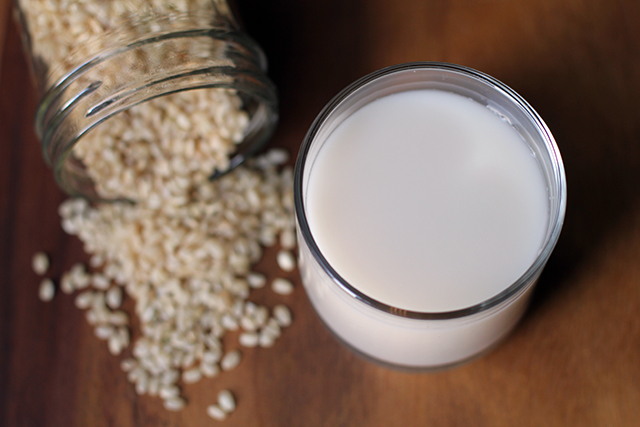
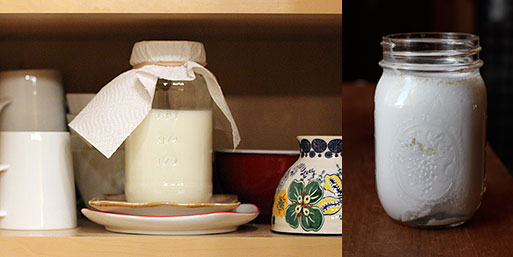
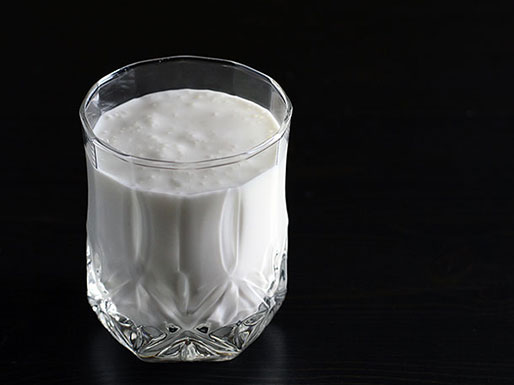
However, uncooked grains soaked overnight and then blended and strained (as if I was making a batch of horchata) got things very close—much lighter and brighter on the tongue. There was something a bit “raw” about the taste that bothered me just slightly, and this version of the milk separated more easily (quickly corrected with a firm shake), but soaking seemed the best method for getting a thin, drinkable “milk” similar to what’s sold in the Tetra Pak at the store. The thicker versions might make for better baking applications (I’ll have to test that down the line), but I wouldn’t want to sip them or pour them on my cereal.

Brown vs White: I tried both kinds of rice and felt a strong preference for brown rice. There was something rounder and more complex about the flavor it brought to the milk.

DIY Rice Milk: Toasted?

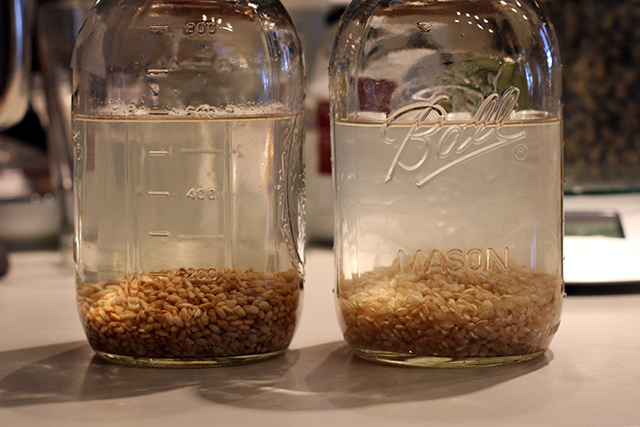
Toasting: As I mentioned above, I didn’t like using the overcooked rice, but there was still something off about the raw rice to my palate. I found that a quick toasting (left, above) in a dry skillet hit the happiest medium.

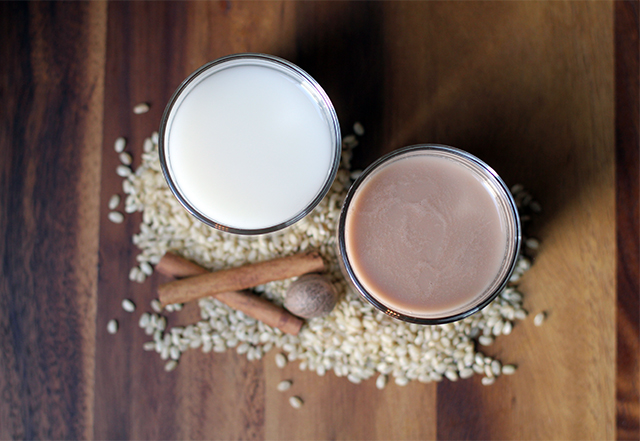
Sweeteners and Flavorings: Commercial rice milk does include oil, which some have suggested adds a creamier mouth feel. I was not a fan, particularly due to the tendency of the homemade milk to easily separate. However, some sweetener and/or flavoring seems needed if it’s going to be used as a beverage. Honey is good, but I like a couple teaspoons of maple syrup even more. White sugar results in a sweetness that’s the closest to the commercial variety. And no matter which you choose, a half teaspoon of vanilla extract is a lovely addition as well.

Do you have a favorite method that I missed or a special flavoring combination? Any tips or tricks you’d recommend?

DIY Rice Milk: Flavorings

The Verdict

Brown rice at my local grocery is selling for 99¢ for one pound, which will make the equivalent of about two and a half 32-ounce boxes of commercial rice milk (retailing for $2.49 each), so—depending on what else you like to add—the economic savings seem obvious. The operation also takes very little active time or effort. When all is said and done, the real question is probably one of taste. While similar to the commercial options, this DIY recipe is not an exact replica of what’s on grocery store shelves. This homemade version tastes more like, well, rice. If you’re looking for a cost-saving option that you are free to flavor to suit your own preferences, however, this is a great way to go.

DIY Rice Milk

DIY Rice Milk
Makes two cups (easily multiplied to match volume needs)

1/2 cup brown rice
2 cups water
Honey, maple syrup, white sugar, or other sweetener to taste (optional)
1/4 teaspoon vanilla extract (optional)
pinch salt

In a dry skillet over medium heat, toast rice grains until fragrant and coloring, stirring regularly, about four minutes. Transfer to a bowl or jar and add 2 cups water. Set aside to soak ten hours.

When soaking in complete, pour rice and water into blender pitcher, add any additional sweeteners and flavorings, and blend at highest setting until rice grains are no longer visible, about 2 minutes.

Using a nut milk bag or similarly fine strainer, drip milk into a clean glass storage jar. Chill rice milk thoroughly before serving. Shake well before each use.

Variations: Add a bit of cocoa powder or cinnamon or nutmeg to the rice and water before blending.

*

This recipe and post were created for my “DIY vs. Buy” column on Serious Eats.

DIY Soy Milk

DIY Soy Milk

During my vegan yogurt experiments, I read a lot about making coconut, almond, and rice milks at home and sorted out my own preferred methods. (Key ingredient across the board? A nylon straining bag.) Now, whenever I find myself standing in front of those Tetra Pak boxed beverages at the grocery, I consider for a second if it’s worth it for me to DIY it at home; even in the chaos of an average week, it usually is.

The one experiment I’ve avoided is soy milk. Basically, I’ve come across headlines espousing the “evils of soy” just often enough to shy away from using it as one of my alternative milk ingredients. I had no nutritional research to back up this decision; rather, it was strictly a case of “Well, I haven’t read anything bad about almonds this week. Let’s just use those!”

Still, I have long been curious about making my own tofu or vegan cheese, so when I came across a bag of soybeans at the Asian market I love exploring, I decided to finally try out boiling up a batch of my own soy milk on the “all things in moderation” philosophy. (And once you start looking, I think there may be just as many articles espousing the “many benefits of soy!”…so, I can only encourage you to make your own judgment call.)

Early research on methods led me quickly to some stunning soy milk makers, an appliance I had never seen before but one that might interest high-volume producers of any type of alternative milk. In my house, a blender and an efficient hand straining method get the job done simply and quickly enough.

DIY Soy Milk: Before and after soaking the beans

DIY Soy Milk: Before and after soaking the beans

Similar to my experience with rice milk that didn’t taste like commercial rice milk, there were plenty of posts lamenting that DIY versions of soy milk just didn’t match what the family was used to from the store. I read a lot about how to avoid a bitter, beany-tasting soy milk (hot water when blending, cooking after straining), and picked up a tip to add a couple tablespoons of oats to the blender to make a creamer product. I didn’t remove all the skins before blending nor did I soak the beans in water fortified with baking soda, though these are also variations out there. Like many of these DIY projects, personal preferences will lead you to your own best practices.

When I first removed the lid off the blender carafe after pureeing the soaked raw beans, I worried over the smell–something about it had a character that had me flashing back to the days I spent oil panting in the ’90s. The milk will also have a raw, beany taste at this stage. (It reminded me of eating a pea or green bean seed right out of the garden.) However, after cooking, the milk will be rich and tasty. I ended up thinning it a bit to get the consistency I was after–an extra benefit to DIYing your own. When I do it again, I will take more care to source a certifiably organic, non-GMO bean.

DIY Soy Milk: Ready for blending

DIY Soy Milk: Ready for blending

If you’re concerned about wasting the pulp (often referred to as okara ), worry not! This byproduct has recipe applications all its own. The skin that can form on the milk when cooking (yuba) also has myriad culinary uses.

Do you make soy milk in some other fashion? Tips and tricks that you’ve picked up that will improve results? I hope you’ll share them in the comments!

DIY Soy Milk

DIY Soy Milk

1 cup dried soybeans
4 cups water just off the boil (plus additional for thinning milk to desired consistency)
2 tablespoons old fashioned rolled oats
1/8 kosher salt
sweetener and/or flavorings such as vanilla or almond extract (optional)

Rinse soybeans, drain, and soak in a generous amount of filtered water overnight. Drain and rinse again, removing any floating loose skins. Drain well and transfer beans to blender.

Add oats and boiled water to beans and secure lid. Puree thoroughly, being cautious that lid remains tightly closed.

Strain puree through a nylon nut milk bag into a 4 qt. pot. (I also tried straining the milk through a cheese cloth-lined strainer, but this was much more difficult to manage in my experience.) Bring the milk up to a gentle simmer, skimming off any foam or skin that forms. Continue to cook, stirring regularly, for about 20 minutes. Add salt and any sweeteners or flavorings desired. Taste and adjust flavorings as needed.

Fresh soy milk can be enjoyed as a warm beverage. Otherwise, transfer it to a glass container with a lid and allow to cool. Refrigerate to store.

https://wonderlandkitchen.com/2013/05/diy-soy-milk/

DIY Kefir: The Champagne of Milk

DIY Kefir

If you’re looking for a probiotic-loaded DIY dairy project that’s a little less involved than yogurt making, the cultured milk drink known as kefir (keh-FEER) just might be for you. For as wildly as yogurt has overtaken our supermarket shelves, not to mention how often Jamie Lee Curtis has regaled us with its health benefits through our televisions, I’m surprised in a way that kefir hasn’t staked more of claim alongside. Admittedly, this “slightly thinner than yogurt” beverage does have a tangy, somewhat sour and yeasty flavor that may not appeal to all palates, and it is sometimes called “the champagne of milk” due to its slight effervescence. Yet even with the sweeteners and other additives found in many of the commercial varieties sold here in the States, its availability is still relatively narrow (and often somewhat pricey). All the more reason to try your hand at making it yourself, controlling both the process and the ingredients.

If you have milk, a glass jar, a plastic or wooden spoon, and a strainer, you’re almost ready to make your first batch. You’ll also need a way to culture the milk into kefir, which can be done in a limited way using a previous batch of kefir containing active cultures or a freeze-dried powdered starter. But for endless culturing and a more extensive list of involved bacteria and yeasts, you’re going to need to acquire dairy kefir grains. While I have seen some people refer to this method as the “hard way,” I think that is more a reference to the need to keep actively feeding the grains and to the possible variabilities in the outcome. The active time required each day will actually only take a couple of minutes.

When I was first offered a share of grains by a woman in my neighborhood, the DIY-er in me jumped at the chance even before I knew much of anything about the fascinating fermentation process I was about to get immersed in. The grains—which can often be described as resembling gummy cauliflower florets, but which can also be much smaller—aren’t actually a grain of any type, but rather a mass of live bacteria and yeasts which, if well cared for, will continue to culture future kefir batches indefinitely.

And if the idea isn’t weird enough for you yet, it seems that no one really knows how the kefir grains came to be. While they will grow and multiply as they eat the lactose in the milk, no one has been able to generate a kefir grain independently, and some even consider them a gift from God. Their origin has been traced to the Caucasus Mountains, where the culturing process likely aided in the preservation of milk before the advent of refrigeration.

Kefir Grains

Sourcing Kefir Grains

Much like a sourdough starter or kombucha SCOBY, you can look for a local maker willing to share with you or purchase grains online. Grains that have been shipped may need to be reconstituted, but even active grains from a nearby source will likely need time to acclimate to a new environment and milk type. Being patient and embracing a period of experimentation at the beginning and any time there is a change in the process (i.e., milk type) will help you avoid frustration and disappointment. I fully confess to learning this lesson the hard way.

The Basics

Culturing kefir requires nothing more than placing the grains and milk in a glass container (leave plenty of headspace), covering it with a paper towel or coffee filter secured with a rubber band, and placing it somewhere out of drafts and sunlight, ideally between 68°F and 78°F. I find that a spot in a kitchen cupboard works well for this, as long as I don’t forget it’s in there.

Once the grains are active (follow package directions if reviving dehydrated grains), a basic formula of about one tablespoon worth of grains to two cups of milk fermented for about 24 hours is the standard process. Once the milk has cultured, the grains are strained out using a plastic (preferred) or stainless steel sieve (other metals can damage the grains or leech into the kefir, and should not be used at any point in the process) and the kefir can then be consumed or refrigerated. The grains are then fed fresh milk, and the process begins again. The grains do not need to be rinsed unless they become contaminated with foreign materials (aka try not to drop them on the kitchen floor).

Kefir: Process

A kitchen cupboard makes a good place to stash your culturing kefir. I like to stop, stir, and strain mine just when it’s starting to show small pockets of whey separation (right).

A kitchen cupboard makes a good place to stash your culturing kefir. I like to stop, stir, and strain mine just when it’s starting to show small pockets of whey separation (right).

Variables, Variables, Variables
(Or: Adjustments, Adjustments, Adjustments)

That being said, fermentation projects are perhaps more an art form than an exact science. The type of milk, the ratio of milk to grains (and the available surface area of the grains in use), and the culturing time and temperature can all impact the taste of the final product.

I found that it took a couple of batches for my grains to start producing a consistent result once I got them home. After a batch or two of adjustment, I wanted to get a firmer handle on the process, so I left the milk to culture about 12 hours overnight, and then began to stir the grains around every few hours and taste the milk using a clean spoon. In this way, I was better able to pinpoint when my milk had thickened and achieved a taste that was agreeable to me.

Once you are comfortable with this part of the process, there are still myriad variations to explore: adding sweeteners and/or fruit before consuming, secondary fermentation options (with or without added flavorings), or even the creation of things such as kefir cheese. Need a buttermilk substitute when baking? Your kefir will be there. You can also use dairy kefir grains to ferment non-animal milks such as soy or coconut, but the grains will need to be refreshed in animal milk every few batches to maintain their health. Those looking for a truly vegan option may wish to explore what’s possible using water kefir grains instead.

Care and Feeding

Despite the implied upkeep, you don’t need to take your grains on vacation with you. They can be stored in fresh milk in the refrigerator for a week or two, or can be rinsed and dried completely and then stored in the refrigerator for a longer period. I have not yet had to store my grains for more than a few days, but you can read more about recommended methods here.

DIY Kefir

The Verdict

Especially if there are not many people in your home who are interested in a morning smoothie fortified with kefir or an afternoon snack of kefir and cookies, I can see that daily production could become overwhelming. If kefir will only be a very occasional treat in your kitchen, the powdered starter might make more sense. Still, learning about these amazing little balls of culturing action was so interesting to me, I would definitely recommend it as something any DIY enthusiast should at least give a try. Apparently you can even eat them, though I haven’t been that brave just yet. And I’m in no way qualified to speak to the many health benefits ascribed to kefir consumption, but there is plenty of interesting reading out there for those who would like to dig in deeper.

Ready to fall down this rabbit hole? You might start here and here.

*

This post was created for my “DIY vs. Buy” column on Serious Eats.

Better Than a Silver Packet: DIY Cream Cheese

DIY Cream Cheese

The deeper I dig into DIYing basic household foods such as rice milk or nut butters, the weirder I sometimes feel about sharing those processes here. Sure, a recipe for homemade cereal bars might come in handy, but a lot of these typical grocery store items–from tahini to garlic powder–end up being pretty simple to produce from scratch in the average kitchen when all is said and done. So perhaps you might think of these posts as more of a Pinterest board of reminders or inspirations when it starts to feel like everything you buy has soy lecithin and whey derivatives added. Sure, you can toss readymade items into your shopping basket as needed, but if you have a few minutes and don’t like the ingredient list on a given product, you can probably whip up your own with a few pantry staples.

For as easy as culturing buttermilk or kefir turned out to be, cream cheese was not a project I was expecting to be so simple. I couldn’t have been more wrong. Yogurt making is almost challenging in comparison.

Pasteurized vs. Ultra Pasteurized

Almost all the articles I’ve read on cheese making have stressed that you cannot use ultra pasteurized milk or cream (the structure of the milk proteins have been damaged). However, I find it increasingly difficult to acquire dairy that is not ultra pasteurized when shopping at a standard grocery store. The organic milk is especially bad in this regard. Apparently people paying big money for these products do not want them to spoil quickly, a concern that supersedes other considerations. And while I love using the rich fresh-from-the-cow, non-homogenized, lightly pasteurized milk I can get from the local dairy at the farmers market, that’s not always practical logistically (only obtainable on Saturday) or financially ($4 per half gallon). Many people will violently advocate for raw milk, whatever it takes to get your hands on it. I haven’t tried it, but I have made other substitutions–the cheap (probably just?) pasteurized whole milk and ultra pasteurized cream available–and still produced a tasty cream cheese.

DIY Cream Cheese: Strained

This Is Not Your KRAFT Philadelphia Cream Cheese

Philly cream cheese is surely the standard most people (Americans, at least) will be judging any cream cheese against, and in my experience this is not that–and that’s a good thing. No matter how long I let my cheese drain, there is a shiny, spackle-like consistency to commercial cream cheese that I have not produced here. This cheese is richer and more buttery, slightly softer but not in any way runny. When adding in flavorings such as maple syrup or dill and salt and whipping briskly with a fork to incorporate, I am able to produce a lovely spread that contains no Xanthan Gum, and/or Carob Bean Gum, and/or Guar Gum, no preservatives, and no “natural flavor”. Seven days later, it still tastes fantastic.

The Verdict

I seriously doubt I will ever buy commercial cream cheese again. There is definitely a cost consideration here in terms of both the dairy and the special ingredients, but I think the taste and quality make it worth the investment (and might even encourage me to eat less and savor more). This cream cheese made me want to bake a dozen everything bagels and invite the neighbors over for brunch….At least until I remembered that my bagel baking, unlike my cream cheese making, is still a work in progress.

DIY Cream Cheese: Thick and Rich

DIY Cream Cheese

Makes: 13 ounces of cream cheese and two cups of whey

DIY Cream Cheese

for tips and supplies, see Cultures for Health

Cream cheese starter cultures containing both the starter culture and rennet are available.

While culturing the cheese with buttermilk rather than a mesophilic starter is riskier due to variations in the active cultures present, I found that the taste of the resulting cream cheese was just slightly more tangy and very attractive.

2 cups heavy cream
2 cups whole milk
1 drop liquid vegetable rennet dissolved in 2 tablespoons water
1/8 tsp. (one packet) mesophilic starter culture OR 1 ounce buttermilk
1/4 teaspoon salt or other flavorings (optional)

In a pot (with a fitted lid for later steps), heat milk and cream to 75°F, stirring regularly.

Remove pot from stove and add the buttermilk OR sprinkle the mesophilic starter culture over the surface of the milk and allow to dissolve for two minutes. Stir gently. Add diluted rennet mixture and combine using an up and down motion with your spoon under the surface of the milk just until evenly incorporated. Cover pot with lid, wrap in a few kitchen towels, and place in a warm location (70°F-75°F) to incubate, about 14 hours.

When cheese is ready to be drained, it will resemble yogurt. Spoon into a strainer lined with a piece of butter muslin. Clip the corners of the muslin together and allow to drain over a bowl (cupboard handles and safety pins can come in handy here) until desired firmness is reached, 7-10 hours.

Mix in a 1/4 teaspoon salt or other flavorings as desired. Transfer to a container with a tight-fitting lid and refrigerate.

https://wonderlandkitchen.com/2013/04/better-than-a-silver-packet-diy-cream-cheese/

NOTE: Produces 13 ounces of cream cheese and two cups of whey.

Cream cheese starter cultures containing both the starter culture and rennet are available.

While culturing the cheese with buttermilk rather than a mesophilic starter is riskier due to variations in the active cultures present, I found that the taste of the resulting cream cheese was just slightly more tangy and very attractive.

2 cups heavy cream
2 cups whole milk
1 drop liquid vegetable rennet dissolved in 2 tablespoons water
1/8 tsp. (one packet) mesophilic starter culture OR 1 ounce buttermilk
1/4 teaspoon salt or other flavorings (optional)

In a pot (with a fitted lid for later steps), heat milk to 75°F, stirring regularly.

Remove pot from stove and add the buttermilk OR sprinkle the mesophilic starter culture over the surface of the milk and allow to dissolve for two minutes. Stir gently. Add diluted rennet mixture and combine using an up and down motion with your spoon under the surface of the milk just until evenly incorporated. Cover pot with lid, wrap in a few kitchen towels, and place in a warm location (70°F-75°F) to incubate, about 14 hours.

When cheese is ready to be drained, it will resemble yogurt. Spoon into a strainer lined with a piece of butter muslin. Clip the corners of the muslin together and allow to drain over a bowl (cupboard handles and safety pins can come in handy here) until desired firmness is reached, 7-10 hours.

Mix in a 1/4 teaspoon salt or other flavorings as desired. Transfer to a container with a tight-fitting lid and refrigerate.DIY Cream Cheese: Savor It!

Mad Hatter Tea Party: Not Too Dry Tea Biscuits

Not Too Dry Tea Biscuits

You may have noticed something of an overarching theme in this site’s construction, but while Alice in Wonderland comes up here and there, I have yet to post any recipes for roasting Jabberwocky or to offer any advice on adding pepper to soups.

That being said, when I came across this now out-of-print cookbook riffing on the classic tale, it seemed like a match I surely could not ignore. It was easier to ignore it once I caught the triple-digit price tag on existing copies, however. Still, even while I waited for a version more within my budget, there were a few treats from the book posted online, so I decided to see where that rabbit hole would lead.

Not Too Dry Tea Biscuits: Tray

Whether you’re plotting a grand tea party for six or it’s just you and your cat, the recipe for these Very Dry Tea Biscuits is simple enough to whip up any time. No worries. As long as you don’t over-bake them, they are not too dry at all, neither are they terribly sweet, though bright hints of lemon and the rich scent of nutmeg accent them beautifully. This recipe turned out about 40 two-inch biscuits for me, and they store perfectly in the freezer. I like having them on hand to pull out at a moments notice when curious guests suddenly arrive and are in need of snacks.

Now that I’ve had a taste of Wonderland cooking, I must admit that roasting Jabberwocky sounds kind of intriguing. Maybe we’ll have to follow this white rabbit a bit more often.

Not Too Dry Tea Biscuits: Process

Not Too Dry Tea Biscuits
from The Alice in Wonderland Cookbook: A Culinary Diversion by John Fisher

1 stick butter, room temperature
1/3 cup sugar
1 egg, lightly beaten
8 ounces flour
2 teaspoons lemon zest
a pinch of salt
a very generous scratch of nutmeg
2 tablespoons milk, as needed

Heat oven to 325°F

In a medium bowl, measure out flour. Add lemon zest, salt, and nutmeg and whisk to combine.

Cream together butter and sugar until light and fluffy. Scrape down the sides of the bowl, add egg, and continue mixing until incorporated. By hand, stir in mixture of flour, lemon zest, salt, and nutmeg. If dough remains too dry, add just enough milk to pull it together.

Roll out dough on lightly floured counter and cut out desired shapes. Place each biscuit on a parchment covered cookie sheet (you can squeeze them fairly close–they will not spread much) and prick each with a fork. Bake 14-16 minutes, or until lightly browned.

Cool completely on a wire rack. Store tightly covered (in the freezer for an even longer shelf life).

DIY Tomato Powder/Paste/Instant Soup

DIY Tomato Powder/Paste

Admittedly, February is probably the least sensible time for a Mid-Atlantic resident to deal with tomatoes. Still, with pretty much everyone I know battling some form of cold/flu/sinus travesty and I myself popping cough drops and drinking mugs of broth for the past couple weeks, I started daydreaming about DIY instant soups free of questionable additives and shocking sodium content. Being a vegetarian, these thoughts leaned towards vegetable-based options rather than chicken and noodles, and the dehydrator I was gifted over the holidays this year suggested all kind of possibilities.

The best course, it seemed to me at the time, would be to start with dehydrated tomato powder to which I could add other seasonings. The local grocery’s produce section offered a depressingly unripe and waxy selection of the fruit, so I settled on some decent-looking plum tomatoes, figuring I’d at least get the most flesh for my dollar that way. I swallowed the $2.29/lbs. price tag; it would have been $3.99/lbs. if I had selected organic fruit.

I cored and de-seeded (but did not peel) two pounds of tomatoes, slicing them in 1/4-inch rings and fitting about a pound per tray in my dehydrator. Unlike the garlic drying, the smell that filled the kitchen was much less overwhelming. Ten hours later, I had a lovely looking pile of perfectly crisp tomato slices, and after popping most of them in the blender I had…1/4 cup of tomato powder. In my heart I had known all along this was an August project, when tomatoes are available by the bushel for under $20. Clearly the math on this DIY project was not really going to work out at this winter rate. I would be much better off buying it.

However, the concentrated flavor of the powder was amazing and not to be wasted. I can see adding this to all kinds of soups, sauces, dips, and dressings, kneading it into bread dough, or sprinkling it on top of pizza along with some garlic powder. And for those concerned about acidic tomatoes and BPA in packaging, it’s a great way to store a large quantity of the former within a small pantry footprint and have “just add water” access to everything from tomato paste to tomato sauce and juice.

Do you use tomato powder? What are your favorite applications?

DIY Tomato Powder/Paste

Tomato Powder: The Method

Wash, core, slice, and de-seed plum tomatoes. Spray dehydrator racks lightly with oil and evenly spread out slices. They can touch but should not overlap. Dehydrate at 135°F for five hours and flip slices. Continue dehydrating until completely crisp, about five hours more.

Allow slices to cool completely and check again to make sure they are completely crisp. Then, using a blender or coffee grinder, reduce the slices to a powder. If grind is uneven, sift powder though a mesh sieve and regrind larger chunks. Store in an airtight glass container in a cool, dark place. Rehydrate portions of the powder to desired consistencies as needed.

The Verdict

I loved the tomato powder itself: versatile, storage-efficient, and delicious. However, it doesn’t make sense to DIY this project in any quantity without access to fresh local tomatoes in bulk. Until then, I will either wait or purchase powder online, where even organic options are available for about $20 per pound.

DIY Instant Tomato Bell Pepper Soup

DIY Instant Tomato Bell Pepper Soup

Note: I experimented with both instant nonfat dry milk and dry whole milk and–when powders were pre-mixed–couldn’t prevent either milk type from curdling upon heating. Non-dairy powdered coffee creamer did work, but a read through the ingredient list pretty much negates the DIY effort if keeping hydrogenated oils and artificial additives out of the soup is a motivator. However, using only the vegetable powders made for such a rich and tasty broth, I didn’t find myself missing the cream.

All of the vegetable powders and dried herbs can be made using a dehydrator at home. Diced onion and rings of de-seeded red bell pepper can be dehydrated and powdered in a similar fashion to the tomato powder above.

2 tablespoons tomato powder
1 teaspoon red bell pepper powder
1/4 teaspoon onion powder (or more to taste)
salt and pepper to taste
pinch of dried dill, parsley, or basil (optional)
1 1/4 cups boiling water

To make single-serving portions, measure vegetable powders and spices in proportions above into sealable plastic bags. When ready to serve, add 1 1/4 cups boiling water and stir until all powder is dissolved.

*

This recipe and post were created for my “DIY vs. Buy” column on Serious Eats.