
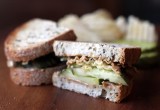
No trip to the bulk bin area of the supermarket is ever quite complete to me without bagging a few scoops out of the sesame stick container. After so much barley and millet and quinoa has been piled up in my cart, something a little fun and snappy just seems to be in order. I had never even considered making them for myself at home as a result–the whole point of the exercise was that it was a treat–but they seemed like a simple enough thing to whip up in the kitchen once I started to think about it.
And, at the end of the day, they can be more or less a one-bowl-and-stir creation. The shaping is where I got hung up. At first, I thought I could get a dough that would just flow out of the wide nozzle of a pastry gun, but that was a fool’s game. A rolled out and neatly sliced dough was quite tasty when baked up, but the straight-edged rectangles visually said “cracker” to me more than “fun snack!” They just weren’t the little snakes of sesame that my brain recognized and loved. So I picked up a piece of the raw cut dough, rolled it quickly just three times between my palms, and there is was. By the time I had a whole sheet, however, I wondered how much I really cared about the shape. What was so wrong with rectangles, my back protested. So shape them however your tastes demand. Uniformity for even baking is the important thing.

DIY Sesame Sticks
makes about 3 cups
1 cup (5 ounces) whole wheat flour
1/2 cup (2 ounces) toasted sesame seeds
1/4 cup (1 1/2 ounces) cup fine cracked wheat
1/4 teaspoon turmeric
1/4 teaspoon beet root powder
1 teaspoon garlic powder or to taste
1 teaspoon kosher salt or to taste
4 tablespoons vegetable oil
6 tablespoons water
Combine flour, sesame seeds, cracked wheat, turmeric, beet powder, garlic powder, and salt in a medium bowl and whisk thoroughly to combine. In a small bowl, combine water and oil. Stir wet ingredients into dry ingredients. Combine thoroughly, kneading any remaining bits into the dough by hand.
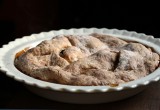
Divide dough in half and wrap each in plastic, flattening into inch-thick squares. Refrigerate for 30 minutes to allow dough to firm up before rolling.
Once dough has chilled, heat oven to 350°F. On a lightly floured surface, roll out dough to 1/8-inch thickness and, using a knife or pizza wheel, cut into small rectangles (approximately 1/4-inch by 3/4-inch). Alternately, roll and cut dough to your desired shape. Uniformity is more important than size to assure even baking.

Leave the pieces as they are or roll each one quickly between your palms to form thin rods. Place on parchment-lined baking sheet.
Bake for ten minutes, then flip or roll the pieces around on the sheet so that the bottoms don’t brown. Continue baking 5-8 minutes more, until sticks are crisp but not browning. Remove from oven and cool completely. Store in an airtight container.
This recipe was created for my “DIY vs. Buy” column on Serious Eats.


hmmmm. I, too, load up on the sesame sticks in the bulk bins. They are the base of my trail mix. I will have to try this. Thanks!
Fun snack!! Obviously, you need to recruit the neighbourhood children for sesame stick rolling activities…
I was wondering if you need to toast the sesame seeds for this first?? I am happy to have found your site! I love DIY in the kitchen!
Happy we’ve made the connection! And good point. All the sesame seeds I’ve purchased come already toasted. So yes, I recommend toasting and will make an amendment to the recipe to specify that.
I have been OBSESSED with these treats recently! But I was curious to see if they couldn’t be made easily at home. And sure enough, they can! Yay! Thanks for the recipe. I made some modifications due to the makeup of my at-home pantry, but I still found that my first batch came out very very salty. I like salty, but this was TOO salty. Like, salt-dough play-dough salty. I reduced the salt to just 1/2 tsp, and that was the ticket! Thanks again for sharing the recipe!
Sorry these ended up too salty! I’m going to test this again.
My guess is commenter was using table salt and not kosher salt.
Molly,
When you say “Cracked wheat” are you refering to something like bulgur/bulghur, little grains of parboiled wheat?
Hi Liz. Yes, pretty much. I used this, but based on my reading of the description, they sound fairly similar.
I’m SO glad to find this recipe! I’ve loved these things for years, but almost never buy them because the nutritional labelling has always indicated that the fiber content was really low or non-existant. So I veered toward more high fiber snacks. but it always baffled me, because the ingredient label mentioned whole wheat flour, sesame seeds and bulgar wheat, ALL of which are high fiber. So I thought maybe it was the proportions used.
looking at this recipe, i can see that I was right all along and now i’m gonna make me a batch.
Thank you!
1/2cup is 4oz & 1/4cup is 2oz
In this recipe, ounces is weight not liquid volume.
I just made and threw these away. The dough was very crumbly, so the ‘sticks’ didn’t stay together, and I failed to read the “too salty” until after I made a few. These tasted like play dough to me (my older sisters tricked me into eating it when I was little so, yes I know what it tastes like) I omitted the beet root powder b/c I read somewhere that it was more for color than flavor. perhaps they were wrong?
I added more water in hope of more cohesion, it didn’t work. Any suggestions on the crumbliness of the dough?
Hey April. So sorry to hear that you’re having problems with the recipe. I’ve tested it and not had an issue with cohesion. Is your cracked wheat a fine variety? That’s my only guess.
April,
I had the same exact problem with my dough. I made it a second time without the cracked wheat component hoping it would help — it did not. I had to modify it both times (I think I added both more water and flour), still with unsuccessful cohesiveness. (Both times, the only way the dough would stick together was rolling it out in a sheet and even then, the end product was still REALLY delicate and crumbly.)
Unfortunately, I can’t offer you any helpful tips because I just gave up and made my own (of which I did not write down). Try subbing out the oil with tahini and adding a bit more water(2-4 TB?) to get a dough that holds together when pinched. I’m sorry; I know that’s vague, but I do a lot of “winging it” in my kitchen. :) I’m pretty sure my version was basically Molly’s minus the cracked wheat and subbing out the oil for tahini, with a tad more water. The end result wasn’t a sesame stick knock off (I have ZERO patience for rollng dough into little logs), but it was delicious and sesame-y, and we loved it in my house. (I think I upped the garlic powder and kept the salt the same, for my version. While Molly’s did well with a smaller amt. of sea salt, mine required a bit more.)
Hope this helped you outsome!
these are really good. thanks for the recipe. Yes, the dough is crumbly at first, but you indicated to add the oil/water slowly till it is just right. I mix with a fork, squeeze the dough against the side of the bowl, finally it becomes the right consistency. Then I did a little more kneading with my hands. It turned out just great.
yes, I bought the Swad brand. I’ll try again, perhaps with the beet root and a different oil
I agree that the beet root is a colorant more than anything. I’m seriously worried that people keep having issues with this recipe, even though I tested it multiple times. Please let me know how it goes.
I would LOVE to know if you have a Gluten free version of these!! My favorite snack but cant eat them anymore :(
I’m wondering if wheat bran would work in place of the cracked wheat. (Just in case I have trouble finding the cracked wheat, since I can always find wheat bran, then just grind it finely at home.)
Have you tried using a tsp of toasted sesame oil in place of an equal amount of the veg oil, to boost the flavor?
I can’t wait to try this recipe. I plan on using it in an Asian inspired snack mix.
I haven’t tried using toasted sesame oil (though I have replaced the veg oil entirely with unrefined sesame oil) but that sounds like a marvelous thing to try. I wonder if the wheat bran would have enough heft to it? I feel like it would need some portion of germ as well.
[…] DIY Sesame Sticks via Wonderland Kitchen […]
I just made what I consider a good version of these. This is what I did: 1) toasted raw sesame seeds while preheating the oven for about 5 minutes; 2) used less salt, no beet powder, no cracked wheat and double the tumeric 3) used about 6-7 tbsp melted butter instead of oil, mixed this in, then added just enough water to make a dough, thus getting a softer result
I followed nil’s lead and made them her way. Still had to mess with it a bit, it took way more flour on the table than I hoped. However, the end product is delicious. It is rather tedious cutting them up but it is worth it to me, as I really love them. I had a hard time getting them all the same size, so a few browned a little and got perhaps overdone, but that didn’t seem to hurt them one bit.
[…] Sheridan, wonderlandkitchen.com / […]