three points kitchen » Wonderland Kitchen
Browsing Category

three points kitchen

Feast O’ Yeast

beertotal21

In addition to the bread making and the butter churning, this year I have also begun running kitchen experiments in alcohol production. My first batch of strawberry wine was a disappointment–fully attributable to user error, I’m sure–but my subsequent stabs at short mead were much more encouraging. I stumbled on little kits from Ambrosia Farm that included a tea flavoring and a bit of yeast at last year’s Renaissance Fair–just add water and honey! Though I wasn’t expecting much from them other than entertainment, they were actually very tasty. Now I am hooked.

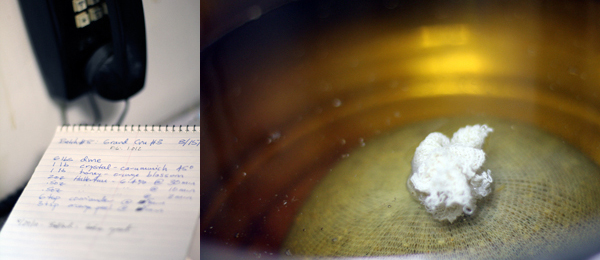
Due to interest (mine) and wrist injury (my friend Scott’s), I had the chance to serve as an apprentice homebrewer last weekend on a 5 gallon batch of beer. We followed the grand cru recipe from “The New Complete Joy of Homebrewing” by Charlie Papazian. Luckily for me, Scott knew exactly what he was doing, as I had not a clue. I am slightly worried to report that I now find this process immensely interesting as well. What can I say: I love food science.

Next up: Kitchen Sake!!

Prelude to a Feast

5518281444_f35ea8e7ba_z

Three Points Kitchen is hosting its first group dinner in D.C. this weekend, and the cooking has already begun! With hints of spring on the horizon and a Persian theme on the table, a few quick pickles have been mixed for the fridge, an elderberry short mead bottled, some yogurt and chutney made up, and a couple flat breads baked (I will try my best not to eat them before Sunday!).

I’ll put my knife down and pick my camera up throughout the weekend, and we’ll catalog the recipes when it’s all over. Meanwhile, an amuse-bouche to get things started. Here we go!

Miles To Go

6112335823_2042380ac5_z

I feel as if I’m getting to the point in my bread-making experience where I’ve done just enough to know how very far I have yet to go before I’m really good at it. I take some small comfort in the idea that, having learned to play the violin as a child, the patience to pursue this slow curve is already trained into my hands. Here’s hoping the muscle memory kicks in as easily as it did when I was ten.


Feeling confident but not yet cocky about my basic country loaf, for try #4 out of the Tartine bread book I decided to mix it up just a bit and do a run of the baguette recipe using the fendu shape (also the version that appears on the cover of the book, I believe). In the end, I got bread alright, and plenty of it, but I also learned a lot of things. While nothing I did destroyed the end product, I think it will be a lot better next time when I mix the initial dough a bit more carefully (myself and my available bowls were overwhelmed by the sheer weight and volume of dough on the table) and, now that I have a a better feel for the flour and crease shape, I think I have a clearer understanding of how to get the correct look from the final loaf. Alas, I’ll just have to do it again. And again. Not to mention start purchasing flour in the large burlap-sack size.

I used to get seriously distressed when recipes didn’t work for me the first time out, and yet I have trouble following instructions to the letter. I learned to play music by ear and I find myself cooking more by picture and smell and feel than by any amount of typed direction. The more comfortable I get in my kitchen, the more value I place on making time to practice and play around with what I’m doing so that I’m actually learning something for the takeaway–risking mistakes for the chance of stumbling onto something more personally satisfying. It doesn’t make the occasional complete failure  any less frustrating, but I’m just starting to understand that I’ve been in this place before.

Tartine Basic Country Loaf: Try #1

tartine3a_600

At 8 a.m. I began mixing the dough for my first Tartine Basic Country Loaf. Well, you could say that I had been mixing it for going on two weeks, since it took that long to get my starter into shape. Now, with just flour and water and patience (and a bit of salt), I was going to make bread.

There was much measuring of flour and water (weight and temperature!). My nurtured starter proved itself ready for the task at hand. Much stirring and folding and folding and folding (every half hour, for most of the morning). And shaping and resting and rising and then…

After all that work and what I thought was a careful flouring of the towel lining my rising bowl (I’ve done the no-knead bread dance more than once), the dough napped for four hours and adhered itself firmly to the material in the process. So there I was, poised over a 500 degree dutch oven with an entire day of careful work flashing through my mind and a teardrop of dough stuck to a towel in my hands. In just the 3 seconds it took to flip the dough over, I thought all was lost. Foul language was used.

In the end, however, the bread forgave me this error, even if it did trade the attractive baker’s slashings for a surface more, um, rustic. Slicing into the first loaf, the crust was flaky and crisp, the inside boasting huge holes, a chewy texture, and a slight but extremely addictive sour note. I pronounced it excellent and made some cream of tomato soup to go with it on this chilly night.

You can check out the photographic play-by-play here. I need a rest, but then I am totally giving this one another run.

UPDATE: Try #3

Okay, I think I’m getting a handle on this process now. And even though it takes time, I like the work of the tasks involved. And it seems especially worth the investment when it comes out of the oven all golden and crackling.

Step One: Training the Starter

I’m declaring 2011 my year of making bread. Sure, I’ve kneaded a yeasty loaf in my day, but now I’m getting serious. There will be flour, and I will weigh it accurately if it kills me.

To kick things off, I thought I’d start by cracking the cover on my copy of Tartine Bread–a book of certifiable food porn if ever there was one. Page follows page of photography that’s tastable (visually, at least) while the text relays the backstory on Chad Robertson’s quest to make great bread. Now that he has found success, the book is essentially his guidance on how to make some for yourself at home.

So I tore myself away from drooling over the images to actually start training my starter up (as outlined in the book’s initial pages) a little over a week ago. So far, so good! Now, I wait. To help pass the time, here’s a beautiful video about the bakery and the process.

Hello Homemade Pierogi (Goodbye, Mrs. T’s)

6112833770_2b18536d68_z

I’ve been eating pierogi (pierogies?) since I was a little kid, but this project takes us a far cry from the freezer-burned grocery store packages of days gone by. And though you would need to be a speedier chef than I proved to be to crack out these tasty dumplings in the 60 minutes the recipe suggests, none of the steps are actually all that challenging. The dough is silky and cooperative and everything works just like you’d expect, so while it’s a time commitment, it can be a relaxing afternoon in the kitchen as well. So turn on NPR, make some tea, and have a feast for dinner (just add sauerkraut and sour cream).

I doubled the batch, figuring that if I was going to invest myself in such a production line, I wanted leftovers. Otherwise I followed the instructions just as I found them at King Arthur, boiled and fried them up in some butter and onions, and deemed them delicious.

Note from Rebecca:

Molly beats me to the punch on this topic. Here I was readying my own pierogi missive, passing on a recipe that my cousins obtained from a cooking class at the Strawberry Hill Museum and Cultural Center  in Kansas City, ground zero for my hometown’s Eastern European communities. It’s very similar to the King Arthur version cited, breaking away to tuck the sour cream into the potato filling instead of the dough. Instead, I’ll offer an alternative filling.

SAUERKRAUT FILLING

3 cups sauerkraut, drained

1 small yellow onion, finely chopped

salt and pepper to taste

2 tablespoons butter

Melt butter in pan and sauté onions. Add sauerkraut, salt and pepper. Turn off heat and stir until combined. Cool approximately 30 minutes before filling pierogi.

Note: Crumbled bacon can be added to filling, or sprinkled over cooked pierogi