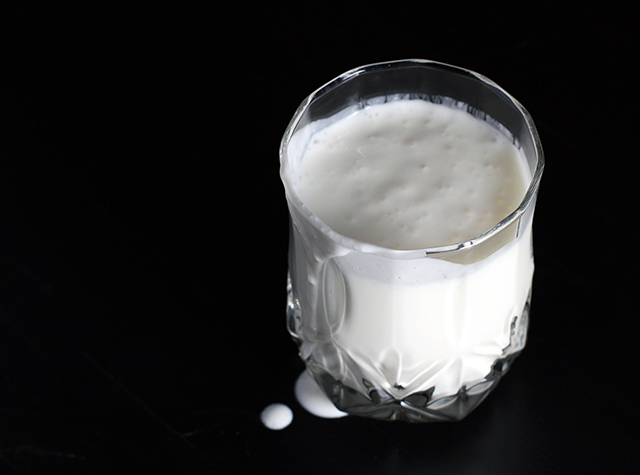
If you’re looking for a probiotic-loaded DIY dairy project that’s a little less involved than yogurt making, the cultured milk drink known as kefir (keh-FEER) just might be for you. For as wildly as yogurt has overtaken our supermarket shelves, not to mention how often Jamie Lee Curtis has regaled us with its health benefits through our televisions, I’m surprised in a way that kefir hasn’t staked more of claim alongside. Admittedly, this “slightly thinner than yogurt” beverage does have a tangy, somewhat sour and yeasty flavor that may not appeal to all palates, and it is sometimes called “the champagne of milk” due to its slight effervescence. Yet even with the sweeteners and other additives found in many of the commercial varieties sold here in the States, its availability is still relatively narrow (and often somewhat pricey). All the more reason to try your hand at making it yourself, controlling both the process and the ingredients.
If you have milk, a glass jar, a plastic or wooden spoon, and a strainer, you’re almost ready to make your first batch. You’ll also need a way to culture the milk into kefir, which can be done in a limited way using a previous batch of kefir containing active cultures or a freeze-dried powdered starter. But for endless culturing and a more extensive list of involved bacteria and yeasts, you’re going to need to acquire dairy kefir grains. While I have seen some people refer to this method as the “hard way,” I think that is more a reference to the need to keep actively feeding the grains and to the possible variabilities in the outcome. The active time required each day will actually only take a couple of minutes.
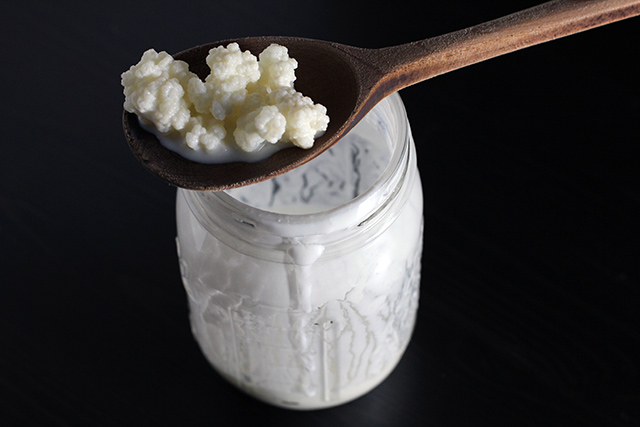
When I was first offered a share of grains by a woman in my neighborhood, the DIY-er in me jumped at the chance even before I knew much of anything about the fascinating fermentation process I was about to get immersed in. The grains—which can often be described as resembling gummy cauliflower florets, but which can also be much smaller—aren’t actually a grain of any type, but rather a mass of live bacteria and yeasts which, if well cared for, will continue to culture future kefir batches indefinitely.
And if the idea isn’t weird enough for you yet, it seems that no one really knows how the kefir grains came to be. While they will grow and multiply as they eat the lactose in the milk, no one has been able to generate a kefir grain independently, and some even consider them a gift from God. Their origin has been traced to the Caucasus Mountains, where the culturing process likely aided in the preservation of milk before the advent of refrigeration.
Sourcing Kefir Grains
Much like a sourdough starter or kombucha SCOBY, you can look for a local maker willing to share with you or purchase grains online. Grains that have been shipped may need to be reconstituted, but even active grains from a nearby source will likely need time to acclimate to a new environment and milk type. Being patient and embracing a period of experimentation at the beginning and any time there is a change in the process (i.e., milk type) will help you avoid frustration and disappointment. I fully confess to learning this lesson the hard way.
The Basics
Culturing kefir requires nothing more than placing the grains and milk in a glass container (leave plenty of headspace), covering it with a paper towel or coffee filter secured with a rubber band, and placing it somewhere out of drafts and sunlight, ideally between 68°F and 78°F. I find that a spot in a kitchen cupboard works well for this, as long as I don’t forget it’s in there.
Once the grains are active (follow package directions if reviving dehydrated grains), a basic formula of about one tablespoon worth of grains to two cups of milk fermented for about 24 hours is the standard process. Once the milk has cultured, the grains are strained out using a plastic (preferred) or stainless steel sieve (other metals can damage the grains or leech into the kefir, and should not be used at any point in the process) and the kefir can then be consumed or refrigerated. The grains are then fed fresh milk, and the process begins again. The grains do not need to be rinsed unless they become contaminated with foreign materials (aka try not to drop them on the kitchen floor).
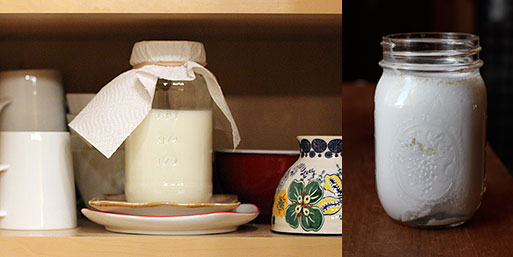
A kitchen cupboard makes a good place to stash your culturing kefir. I like to stop, stir, and strain mine just when it’s starting to show small pockets of whey separation (right).
A kitchen cupboard makes a good place to stash your culturing kefir. I like to stop, stir, and strain mine just when it’s starting to show small pockets of whey separation (right).
Variables, Variables, Variables
(Or: Adjustments, Adjustments, Adjustments)
That being said, fermentation projects are perhaps more an art form than an exact science. The type of milk, the ratio of milk to grains (and the available surface area of the grains in use), and the culturing time and temperature can all impact the taste of the final product.
I found that it took a couple of batches for my grains to start producing a consistent result once I got them home. After a batch or two of adjustment, I wanted to get a firmer handle on the process, so I left the milk to culture about 12 hours overnight, and then began to stir the grains around every few hours and taste the milk using a clean spoon. In this way, I was better able to pinpoint when my milk had thickened and achieved a taste that was agreeable to me.
Once you are comfortable with this part of the process, there are still myriad variations to explore: adding sweeteners and/or fruit before consuming, secondary fermentation options (with or without added flavorings), or even the creation of things such as kefir cheese. Need a buttermilk substitute when baking? Your kefir will be there. You can also use dairy kefir grains to ferment non-animal milks such as soy or coconut, but the grains will need to be refreshed in animal milk every few batches to maintain their health. Those looking for a truly vegan option may wish to explore what’s possible using water kefir grains instead.
Care and Feeding
Despite the implied upkeep, you don’t need to take your grains on vacation with you. They can be stored in fresh milk in the refrigerator for a week or two, or can be rinsed and dried completely and then stored in the refrigerator for a longer period. I have not yet had to store my grains for more than a few days, but you can read more about recommended methods here.
The Verdict
Especially if there are not many people in your home who are interested in a morning smoothie fortified with kefir or an afternoon snack of kefir and cookies, I can see that daily production could become overwhelming. If kefir will only be a very occasional treat in your kitchen, the powdered starter might make more sense. Still, learning about these amazing little balls of culturing action was so interesting to me, I would definitely recommend it as something any DIY enthusiast should at least give a try. Apparently you can even eat them, though I haven’t been that brave just yet. And I’m in no way qualified to speak to the many health benefits ascribed to kefir consumption, but there is plenty of interesting reading out there for those who would like to dig in deeper.
Ready to fall down this rabbit hole? You might start here and here.
This post was created for my “DIY vs. Buy” column on Serious Eats.







Stumbled across your blog. Super amazing! I am a chef so I am always looking for great DIY projects, love the tomato power! Will be pinning you lots!
Thanks, Alexis. Please let me know how things work for you and if you have requests for future DIY post topics.
Have you tried making Kefir out of almond milk?
I haven’t, though I’m looking forward to trying out some alternative “milks”. If lactose is an issue for you, I did notice lots of discussion of even dairy kefir possibly being safe to consume, since the kefir grains consume lactose, thereby significantly lowing the levels. I’m not trained to make this call for you, of course, but something you might want to look into.
Speaking of alternative milks: I’ve also been thinking about homemade soymilk, and noticed there are actually machines sold that do this. Have you ever tried one?
I had thought about getting a soymilk maker sometime ago. After I started reading user reviews, i backed out. The latest soymilk maker does not require one to soak the beans. So I question the taste of the end product. For now, I am happy making soy milk/almond milk using my new toy, Omega 8006 cold press juicer.
Just wanted to say – I was given some kefir grains from a friend, gradually changed them from cow to soya milk over the course of a few days, and have been getting lovely, creamy kefir from them for about a year now without ever putting them back into dairy milk.
PS: Kefir makes fantastic scones!
Awesome. Thanks for the tips, Harri!
Hi Harri,
I am getting ready to make coconut and/or almond milk kefir. I have been reading up on it and understand that the kefir grains have to be soaked in milk every couple of weeks to keep them alive. Is that what you do?
Hello Peggy,
I’ve read that too, but after changing my grains over to soya milk I have never put them back into animal milk. I’ve had them for about 18 months, and they are as alive as ever! They seem to ferment the soya milk really quickly. I have given some away and they keep on replenishing themselves. I do think that they are a slightly different colour to what they were originally – more greyish.
Good luck with whatever you decide to do!
PS: I’m not sure how that would work with nut milks – have often wondered about it myself, as I would prefer not to be consuming so much soya. Does anyone else have experience of this? Please let me know how you get on Peggy.
Hi, I’m just starting with kefir milk but am going to try using almond milk as Im not too keen on dairy. Do I need to do anything with the grains after I strain the milk, do the grains multiply and how many grain for 2 cups of almond milk approx? thanks.
Hi Dawn. I don’t have first-hand experience with non-dairy milks, but there are experts out there. Some say you need to “rest” the grains in real dairy every few weeks, others seem not to need to do that. I had a scant tablespoon of grains in my 2-cup jars I believe, but this is very much a process of experimentation to get the right fit for your environment/milk/schedule.
Can I use store bought Almond milk to make kefir?
Hi Connie. Non-dairy milks have different challenges, which you’ll want to read up on. Though for many, the culturing process eliminates the lactose issues that may be holding you back from dairy otherwise.
I have a dairy allergy and looking to make my first batch of Kefir with Almond milk, cashew, and coconut milk. I have bought vegan probiotics pills that I will open to use and see how it takes to these non dairy milks. If they do not take I will be making my own almond milk, soaking them then puree them and add the probiotics. From the research some are saying the sugars and other ingredients can cause for the probiotics to not take I guess. Will keep an update!!! Excited to try this!!