snack » Wonderland Kitchen
Browsing Tag

snack

Mad Hatter Tea Party: Not Too Dry Tea Biscuits

Not Too Dry Tea Biscuits

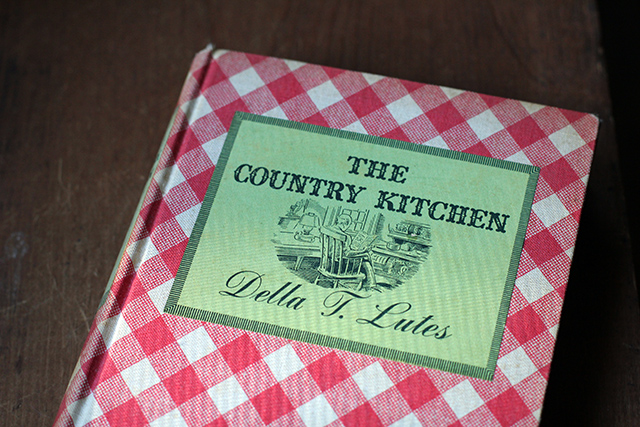
You may have noticed something of an overarching theme in this site’s construction, but while Alice in Wonderland comes up here and there, I have yet to post any recipes for roasting Jabberwocky or to offer any advice on adding pepper to soups.

That being said, when I came across this now out-of-print cookbook riffing on the classic tale, it seemed like a match I surely could not ignore. It was easier to ignore it once I caught the triple-digit price tag on existing copies, however. Still, even while I waited for a version more within my budget, there were a few treats from the book posted online, so I decided to see where that rabbit hole would lead.

Not Too Dry Tea Biscuits: Tray

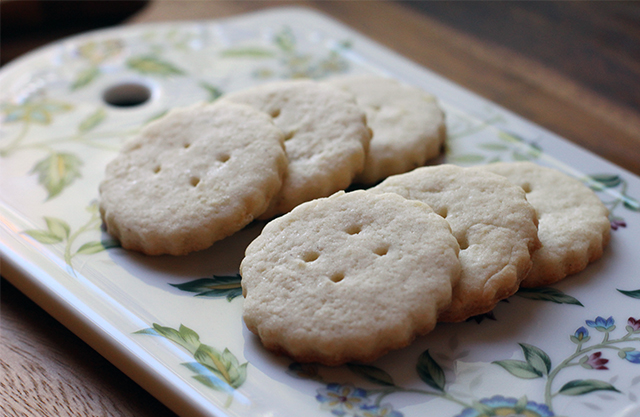
Whether you’re plotting a grand tea party for six or it’s just you and your cat, the recipe for these Very Dry Tea Biscuits is simple enough to whip up any time. No worries. As long as you don’t over-bake them, they are not too dry at all, neither are they terribly sweet, though bright hints of lemon and the rich scent of nutmeg accent them beautifully. This recipe turned out about 40 two-inch biscuits for me, and they store perfectly in the freezer. I like having them on hand to pull out at a moments notice when curious guests suddenly arrive and are in need of snacks.

Now that I’ve had a taste of Wonderland cooking, I must admit that roasting Jabberwocky sounds kind of intriguing. Maybe we’ll have to follow this white rabbit a bit more often.

Not Too Dry Tea Biscuits: Process

Not Too Dry Tea Biscuits
from The Alice in Wonderland Cookbook: A Culinary Diversion by John Fisher

1 stick butter, room temperature
1/3 cup sugar
1 egg, lightly beaten
8 ounces flour
2 teaspoons lemon zest
a pinch of salt
a very generous scratch of nutmeg
2 tablespoons milk, as needed

Heat oven to 325°F

In a medium bowl, measure out flour. Add lemon zest, salt, and nutmeg and whisk to combine.

Cream together butter and sugar until light and fluffy. Scrape down the sides of the bowl, add egg, and continue mixing until incorporated. By hand, stir in mixture of flour, lemon zest, salt, and nutmeg. If dough remains too dry, add just enough milk to pull it together.

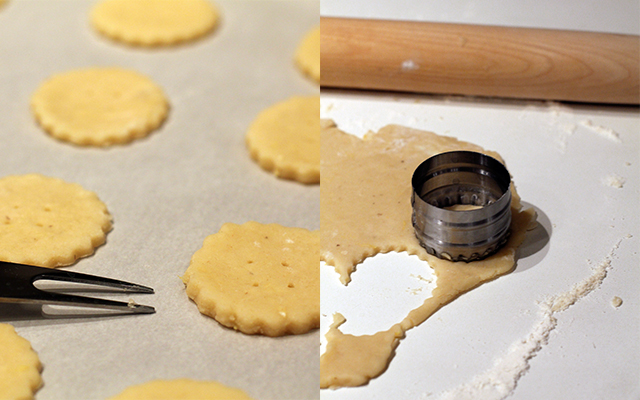
Roll out dough on lightly floured counter and cut out desired shapes. Place each biscuit on a parchment covered cookie sheet (you can squeeze them fairly close–they will not spread much) and prick each with a fork. Bake 14-16 minutes, or until lightly browned.

Cool completely on a wire rack. Store tightly covered (in the freezer for an even longer shelf life).

National Peanut Butter and Jelly Day: Peanut Butter & Pickle Variation

Peanut Butter & Pickle Sandwich

National Mustard Day (August 5)? National Split Pea Soup Week (the second week of November)? The volume of so-called “national food holidays” tends to make me uncomfortable in the same way that overly sentimental greeting cards do–the thought is largely inoffensive, but the meaning generic and diluted. (Though maybe not when it comes to National Margarita Day. That one I think I’d keep in regular rotation.)

I would have overlooked National Peanut Butter and Jelly Day today, except that it seems to have stirred up the conversation around the peanut butter and pickle variation and this is a sandwich I feel compelled to advocate for. It being my snack of preference as a picky-eater kid, I was honestly shocked to discover how many people think this is a dish entirely too gross to even consider tasting. For me, it carries the memory of sneaking in late from high school dates and hanging out in the quiet of the kitchen, all the ingredients laid out on the counter while I made my preparations by the dim glow of the stove’s overhead light. Inevitably, my mom would hear me clanking around and get out of bed to ask how my night had been. Then she’d shuffle back to her room, wondering aloud why I hadn’t bothered to eat properly while I was out.

Peanut Butter & Pickle Sandwich: Makings

Was my PB&P just a passing teenage infatuation? While for some reason I had largely abandoned this childhood sweetheart when I left Ohio, our reconnection was as delicious as I could have hoped for. A suspicious “what are you eating?” inquiry and taste bite request from my husband had him making his own before my plate was clean. Should you wish to take a pass on this sweet and savory treat, well, the more for us. But you won’t know what you’re missing.

Peanut Butter & Pickle Sandwich: Slices

Peanut Butter & Pickle Sandwich

Peanut Butter & Pickle Sandwich

rye bread (seeded preferred)
peanut butter (a sweet variety is best, for balance)
kosher dill pickle slices (though some prefer the sweetness of bread and butter style)
potato chips (thick ridged variety, if possible)

Toast the bread and spread both slices with a generous layer of peanut butter. Layer pickle slices over one slice and crush chips over the other. Sandwich together and slice in half.

Plate with additional chips and pickles if you’re feeling fancy; eat over the sink at 2 a.m. and don’t clean the crumbs off the counter before you go to bed if you’re feeling rebellious.

https://wonderlandkitchen.com/2013/04/national-peanut-butter-and-jelly-day-peanut-butter-pickle-variation/

rye bread (seeded preferred)
peanut butter (a sweet variety is best, for balance)
kosher dill pickle slices (though some prefer the sweetness of bread and butter style)
potato chips (thick ridged variety, if possible)

Toast the bread and spread both slices with a generous layer of peanut butter. Layer pickle slices over one slice and crush chips over the other. Sandwich together and slice in half. Plate with additional chips and pickles if you’re feeling fancy; eat over the sink at 2 a.m. and don’t clean the crumbs off the counter before you go to bed if you’re feeling rebellious.

Picture Imperfect Tastes: The Apple Dowdy

Aunt Hanner's Apple Dowdy

I wasn’t going to write about my little weekend adventure into historical cooking, but then I caught this post which, in addition to being very moving in its broader terms, included a kicker towards the end: “I sometimes worry that commoditized simplicity will become fetish, and ultimately an over-stressed trend.” Ah, yes, that back-to-basics lifestyle showcased so perfectly on many a Pinterest board transformed into a danger all its own? I took her point.

Here I’ll offer a flip side to the situation, however. Ever since devouring Della Lutes’s The Country Kitchen (Little, Brown, and Company, 1936) during a road trip last summer, I’ve meant to go back and actually try to cook some of the classically imprecise recipes sprinkled throughout the text (though Lutes does go the extra mile in trying to help the reader get a handle on how things were done if classic biscuit ratios aren’t already ingrained). It was the current chill that finally got this project accomplished, however, and in the end I settled on making the Apple Dowdy: “not a dumpling, a pudding or a pie–deep-dish or otherwise. It is just a dowdy–sort of common, homely, gingham-like, but it has character.”

The Country Kitchen

Now, as I have likely mentioned before, I hate to measure. Reading and then correctly following instructions goes against my genetic makeup. As a result, baking often terrifies me. But in this recipe, I felt a permission to follow instinct that your typical, weighed out in grams baking situation doesn’t encourage. Portions where emotional (“with generous judgment”) and relaxed (“a slight scattering”). Plus, with a suggested cook time of 3 hours (!!) there would be none of this “at 18 minutes it’s baked through, at 20 minutes it’s burned” stress. I exaggerate, but you’ve been there, right?

Not having a “deep earthen pudding dish” on hand, I used a ceramic pie plate. This turned out to be too large, requiring that I roll my dough thinner than the indicated 3/4 inch and, as a result, reducing my baking time to 2 hours. I suppose I could have tented it with foil to prevent over-browning, but it smelled so good that I could wait no longer. I’ll try and follow the directions more carefully next time, but served warm out of the oven with a splash of cream, this dowdy was straightforwardly delicious. I hesitate to get into any additional cliches of “classically simple” and “old world,” but maybe because its construction was so basic (pantry staples!), its assembly so laid back (15 minutes, inspiration to oven!), it was a truly fine and satisfying way to warm up the house and the spirit on a cold winter’s afternoon.

Aunt Hanner's Apple Dowdy

Aunt Hanner’s Apple Dowdy

for the filling

4 or 5 medium apples, tart and firm, peeled and quartered (I used an apple slicer/corer and so ended up with 8 slices per apple)
brown sugar (sprinkle enough to suit your apples)
nutmeg (“a slight scattering”)
cinnamon (“a little less”)
salt (“dash”)
butter (“with generous judgment,” about a teaspoon per serving)
1/2 cup warm water

for the crust

1 cup AP flour
2 teaspoons baking powder
1/4 teaspoon salt
2 tablespoons butter
1/2 cup milk

Heat oven to 325°F.

Fill your baking dish with prepared apples and scatter sugar, spices, and butter over top. Pour in water at the side.

In a medium bowl whisk flour, baking powder, and salt, and cut in butter. Add milk and stir just until dough comes together. Roll out on a floured counter until about 3/4-inch thick and just large enough to cover apples. Fit and crimp down over top and slash top to vent.

Aunt Hanner's Apple Dowdy: Unbaked

Bake for three hours, watching to make sure crust does not over-brown. Serve warm straight from the oven with a splash of cream and extra sugar if desired.

DIY Pumpkin (Pie) Seed Butter

DIY Pumpkin (Pie) Seed Butter

Between making nut butters and non-dairy milks, everywhere I look I now see how a motor and some pantry staples can result in easy-to-whip-up versions of commercial products: tahini, sunflower butter, nut/grain/coconut milks. This is how I found myself standing in the bulk aisle considering what else might make for a tasty spread or beverage. I spied the pumpkin seeds and wondered, hey, would pumpkin seed butter taste good? Is that a thing already? (It is, though it is a pricey and not necessarily readily available option.)

In a general grocery store situation, the pepitas may already be salted and roasted, so no need to add additional salt unless it’s your preference. If you have raw hauled seeds, you can toast them in the oven before processing. Of course, some people are looking to keep their diet raw, and you can use raw seeds if that suits your nutritional preferences best. However, roasting will deliver a richer flavor.

Due to the high fat content of the seeds, they can easily go rancid. Take care to purchase fresh seeds and then keep them in a sealed bag or airtight container. Seeds can be stored in the refrigerator or freezer for a longer shelf life.

January’s unrelenting grey drizzle has me in the mood for something warm and comforting, so I have seasoned this recipe with homemade pumpkin pie spice and maple syrup. You may certainly omit or reduce any spices you don’t like, and use honey or another sweetener instead or omit these things completely.

I was surprised to read comments along the lines of, “an acquired taste, but I’ll eat it because it’s healthy,” attached to some commercial versions of pumpkin seed butter. Maybe it’s because I soup mine up with a touch of sweetener and spice, but I could eat the whole jar with a spoon if no one was looking. And if there are nut allergy concerns, you may find this to be a great tasting and safe alternative (though check with your healthcare professional first).

DIY Pumpkin (Pie) Seed Butter: Ingredients

DIY Pumpkin (Pie) Seed Butter
makes approximately 2 cups

Note: If you have raw hauled seeds, toast them in a 350° oven, stirring occasionally, for ten minutes or until fragrant, popping, and lightly browned. Oiling them is not necessary. Add a 1/4 teaspoon salt (or to taste) to the recipe.

3 cups roasted and salted pepitas
1/2 teaspoon ground cinnamon
1/4 teaspoon ground nutmeg
1/4 teaspoon ground ginger
1/8 teaspoon ground allspice
1/8 teaspoon ground cloves
2 teaspoons maple syrup, or to taste
2 tablespoons neutral oil of your choice, plus additional as needed

Combine all ingredients in the bowl of a food processor and process, stopping occasionally to scrap down sides, until desired consistency is reached. Add more oil by the tablespoonful as needed if the butter is too dry.

Scoop butter into a container with a tight-fitting lid and store in the refrigerator.

*

This post was shared in a blog hop hosted by the awesome Frugal Days, Sustainable Ways. The site offers tons of inspiring DIY ideas, so definitely check it out!

This recipe and post were created for my “DIY vs. Buy” column on Serious Eats.

Real Deal: DIY Sesame Sticks

ss_top

No trip to the bulk bin area of the supermarket is ever quite complete to me without bagging a few scoops out of the sesame stick container. After so much barley and millet and quinoa has been piled up in my cart, something a little fun and snappy just seems to be in order. I had never even considered making them for myself at home as a result–the whole point of the exercise was that it was a treat–but they seemed like a simple enough thing to whip up in the kitchen once I started to think about it.

And, at the end of the day, they can be more or less a one-bowl-and-stir creation. The shaping is where I got hung up. At first, I thought I could get a dough that would just flow out of the wide nozzle of a pastry gun, but that was a fool’s game. A rolled out and neatly sliced dough was quite tasty when baked up, but the straight-edged rectangles visually said “cracker” to me more than “fun snack!” They just weren’t the little snakes of sesame that my brain recognized and loved. So I picked up a piece of the raw cut dough, rolled it quickly just three times between my palms, and there is was. By the time I had a whole sheet, however, I wondered how much I really cared about the shape. What was so wrong with rectangles, my back protested. So shape them however your tastes demand. Uniformity for even baking is the important thing.

Sesame Sticks: Ingredients

DIY Sesame Sticks
makes about 3 cups

1 cup (5 ounces) whole wheat flour
1/2 cup (2 ounces) toasted sesame seeds
1/4 cup (1 1/2 ounces) cup fine cracked wheat
1/4 teaspoon turmeric
1/4 teaspoon beet root powder
1 teaspoon garlic powder or to taste
1 teaspoon kosher salt or to taste
4 tablespoons vegetable oil
6 tablespoons water

Combine flour, sesame seeds, cracked wheat, turmeric, beet powder, garlic powder, and salt in a medium bowl and whisk thoroughly to combine. In a small bowl, combine water and oil. Stir wet ingredients into dry ingredients. Combine thoroughly, kneading any remaining bits into the dough by hand.

Divide dough in half and wrap each in plastic, flattening into inch-thick squares. Refrigerate for 30 minutes to allow dough to firm up before rolling.

Once dough has chilled, heat oven to 350°F. On a lightly floured surface, roll out dough to 1/8-inch thickness and, using a knife or pizza wheel, cut into small rectangles (approximately 1/4-inch by 3/4-inch). Alternately, roll and cut dough to your desired shape. Uniformity is more important than size to assure even baking.

Sesame Sticks: Shaping

Leave the pieces as they are or roll each one quickly between your palms to form thin rods. Place on parchment-lined baking sheet.

Bake for ten minutes, then flip or roll the pieces around on the sheet so that the bottoms don’t brown. Continue baking 5-8 minutes more, until sticks are crisp but not browning. Remove from oven and cool completely. Store in an airtight container.

*

This recipe was created for my “DIY vs. Buy” column on Serious Eats.

Anatomy of a Snack

toppawa

For the first time in a long while, I woke up this morning with no one expecting any kind of work out of me whatsoever. As a change of pace, I found a new book to read, announced to the cat that I was taking a vacation, poured some coffee, and plopped down on the couch.

All that relaxing eventually made me hungry, however, so I headed to the grocery for some fun, over-processed treat to fuel this day of slothfulness (as part of my vacation, I was keeping off the internet and out of the kitchen). Cruising down the aisles failed to produce anything tempting–plus, I realized halfway through my shopping adventure that it would be hard to eat and enjoy something made of things I could not pronounce while simultaneously reading a book about farming. I re-strategized, grabbed a couple potatoes, a jalapeño pepper, and a bunch of cilantro, and headed home to fry up the awesomest of hot afternoon snacks: Potato and Peanut Pawa.

This is a dish I rediscovered in World Food Cafe: Global Vegetarian Cooking (a too-short collection of amazing vegetarian recipes from exotic locales), but I first ate it in Nepal almost a decade ago. The woman I was living with would drop everything to whip up a batch for any late-afternoon guests who wandered in needing something substantial to nosh on. As far as timing went, this usually occurred while she was also in the middle of making dinner, and the fact that she would just reshuffle and squeeze in another pan on the two-burner stove amazed me. It also irked me somewhat, since these hungry stomachs interrupting things never seemed to belong to her friends but rather a group of dudes who came to have leisurely chats with her husband. I liked the snack a great deal, however, so I kept my opinions to myself and tried to help out.

The most interesting ingredient in this dish to me is the pawa, also called beaten or flattened rice. It doesn’t taste like much of anything on its own, but once fried up with the potatoes and peanuts, it sucks up the salt and oil flavors and becomes quite a tasty aspect to the mix while keeping the potatoes from clumping together.

Step-by-step photos and my variation on the recipe can be found here.