snacks » Wonderland Kitchen
Browsing Category

snacks

National Peanut Butter and Jelly Day: Peanut Butter & Pickle Variation

Peanut Butter & Pickle Sandwich

National Mustard Day (August 5)? National Split Pea Soup Week (the second week of November)? The volume of so-called “national food holidays” tends to make me uncomfortable in the same way that overly sentimental greeting cards do–the thought is largely inoffensive, but the meaning generic and diluted. (Though maybe not when it comes to National Margarita Day. That one I think I’d keep in regular rotation.)

I would have overlooked National Peanut Butter and Jelly Day today, except that it seems to have stirred up the conversation around the peanut butter and pickle variation and this is a sandwich I feel compelled to advocate for. It being my snack of preference as a picky-eater kid, I was honestly shocked to discover how many people think this is a dish entirely too gross to even consider tasting. For me, it carries the memory of sneaking in late from high school dates and hanging out in the quiet of the kitchen, all the ingredients laid out on the counter while I made my preparations by the dim glow of the stove’s overhead light. Inevitably, my mom would hear me clanking around and get out of bed to ask how my night had been. Then she’d shuffle back to her room, wondering aloud why I hadn’t bothered to eat properly while I was out.

Peanut Butter & Pickle Sandwich: Makings

Was my PB&P just a passing teenage infatuation? While for some reason I had largely abandoned this childhood sweetheart when I left Ohio, our reconnection was as delicious as I could have hoped for. A suspicious “what are you eating?” inquiry and taste bite request from my husband had him making his own before my plate was clean. Should you wish to take a pass on this sweet and savory treat, well, the more for us. But you won’t know what you’re missing.

Peanut Butter & Pickle Sandwich: Slices

Peanut Butter & Pickle Sandwich

Peanut Butter & Pickle Sandwich

rye bread (seeded preferred)
peanut butter (a sweet variety is best, for balance)
kosher dill pickle slices (though some prefer the sweetness of bread and butter style)
potato chips (thick ridged variety, if possible)

Toast the bread and spread both slices with a generous layer of peanut butter. Layer pickle slices over one slice and crush chips over the other. Sandwich together and slice in half.

Plate with additional chips and pickles if you’re feeling fancy; eat over the sink at 2 a.m. and don’t clean the crumbs off the counter before you go to bed if you’re feeling rebellious.

https://wonderlandkitchen.com/2013/04/national-peanut-butter-and-jelly-day-peanut-butter-pickle-variation/

rye bread (seeded preferred)
peanut butter (a sweet variety is best, for balance)
kosher dill pickle slices (though some prefer the sweetness of bread and butter style)
potato chips (thick ridged variety, if possible)

Toast the bread and spread both slices with a generous layer of peanut butter. Layer pickle slices over one slice and crush chips over the other. Sandwich together and slice in half. Plate with additional chips and pickles if you’re feeling fancy; eat over the sink at 2 a.m. and don’t clean the crumbs off the counter before you go to bed if you’re feeling rebellious.

DIY Black Tahini and Beet Hummus

Black Tahini Beet Hummus

There are few constants in my kitchen, but one of them might be the high probability that there is a semi-full can of tahini hiding out at the back of the fridge on any given evening. Its precise origin and month of purchase are murky. I’m sure I thought about inking the date on the lid when I first open it, but I didn’t.

Lurking tahini

For anyone nodding along with me here, I have a new philosophy: I will henceforth buy sesame seeds and make my own tahini as needed, a 1/2 cup at a time. True, DIY versions of the purée may not be quite as smooth as the commercial variety. However, I found that a cup of seeds and a couple tablespoons of oil given a two-minute run in my blender came way too close to argue over. And if you were thinking about arguing, let’s talk again after you’ve tried to stir the separated oil back into the that neglected-for-weeks tahini in your fridge.

To make things a little more exotic, when I spotted some black sesame seeds at the grocery recently, I wondered: Was black tahini a thing? Yes! And not only that, I found it to blend smooth with half the amount of oil needed to convert white sesame seeds, plus the flavor was less bitter. I got a sweeter, nuttier paste. Plus, the color is just amazing (or terrifying, I suppose, depending on your tastes).

With such black gold at my finger tips, I decided to add it to a hummus that could stand up to it, pigment-wise. The Hungarian in my soul cried out for beets, though even if you are not normally a fan of this superfood, you may yet enjoy this dip. The color alone is sure to turn a few heads at your next gathering.

I decided to use my blender to process the tahini rather than my food processor, as the bowl is narrower and there are more blades on the job. Unlike my food processor, it is much harder for the seeds to cling to the sides away from the cutting action. However, my hopes to make even smaller batches in the blender and process the hummus in the same container right on top were, sadly, a fail. A cup of sesame seeds made a beautiful 1/2 cup of black tahini in minutes; a 1/4 cup of seeds just made a splattered unprocessed mess. Your appliances may serve you better.

Black Tahini

The Method: DIY Black Tahini

1 cup black sesame seeds, toasted just until fragrant (since they are black, take care not to burn them)
2 tablespoons olive oil, plus addition as needed

Place toasted sesame seeds and olive oil in a blender. Purée one minute, scrape down sides, and purée an additional minute, adding more olive oil as needed. Continue blending until smooth and pourable. Transfer to a jar with a tight-fitting lid and store, covered, in the refrigerator.

NB: The process is identical if using white sesame seeds, though I found that I needed twice the amount of oil. Using untoasted white seeds, however, produced a bitter tahini that I could not recommend.

The Verdict

Like many condiment projects, the major benefits of DIY-ing your own relate to freshness and control over ingredients. Once again, there is also a cost/time consideration. Even without making a bulk purchase, I paid $3.99 for 8 ounces of black sesame seeds which (using the method above) results in about a cup of tahini. Commercial versions of the same volume retail for anywhere from $5.29 to $12.59. Personally, the chance to step back to just a jar of sesame seeds in the pantry that can be used both to whip up small batches of tahini and in other projects as well makes this the way to go.

Beet Hummus: Processing

DIY Black Tahini and Beet Hummus

Makes: about 2 1/2 cups

DIY Black Tahini and Beet Hummus

4 medium beets (about 8 ounces), roasted, peeled, and cubed
1 (15-ounce) can chickpeas, drained and rinsed
1 teaspoon cumin seed, toasted and ground
2 tablespoons black tahini (or substitute regular tahini)
3 tablespoons lemon juice
1 tablespoon balsamic vinegar
1 clove garlic
1/2 teaspoon kosher salt, or to taste
4 tablespoons olive oil, plus additional as needed
parsley for garnish

Place all ingredients in a food processor and run until smooth, adding additional oil as needed to achieve desired consistency. Garnish with an additional drizzle of olive oil and chopped parsley.

https://wonderlandkitchen.com/2013/02/diy-black-tahini-and-beet-hummus/

4 medium beets (about 8 ounces), roasted, peeled, and cubed
1 (15-ounce) can chickpeas, drained and rinsed
1 teaspoon cumin seed, toasted and ground
2 tablespoons black tahini (or substitute regular tahini)
3 tablespoons lemon juice
1 tablespoon balsamic vinegar
1 clove garlic
1/2 teaspoon kosher salt, or to taste
4 tablespoons olive oil, plus additional as needed
parsley for garnish

Place all ingredients in a food processor and run until smooth, adding additional oil as needed to achieve desired consistency. Garnish with an additional drizzle of olive oil and chopped parsley.

*

This recipe and post were created for my “DIY vs. Buy” column on Serious Eats.

DIY Dairy-Free Coconut Yogurt

DIY Dairy-Free Coconut Yogurt

My first attempt at dairy-free yogurt earlier this fall was a disaster. Admittedly, I was feeling a little cocky since I’d had a run of really great batches of Greek yogurt. I was so confident, in fact, that I didn’t even hunt around online ahead of time for tips. This was especially dumb since I’ve never needed to adhere to a dairy-free diet myself and was quite inexperienced. I simply dove in with my Tetra Pak of coconut milk beverage and my vegan yogurt starter. The result: a nauseatingly curdled liquid that was immediately fed to the drain in the kitchen sink.

Appropriately chastened, I started reading. There are myriad ways to make traditional yogurt, and going dairy-free only increases the number of variables. I played around with sweeteners, thickeners, and styles of coconut milk to land on the version I liked best, and used a method for incubating that works for me. Your preferences may vary, of course, and I hope you’ll share them in the comments.

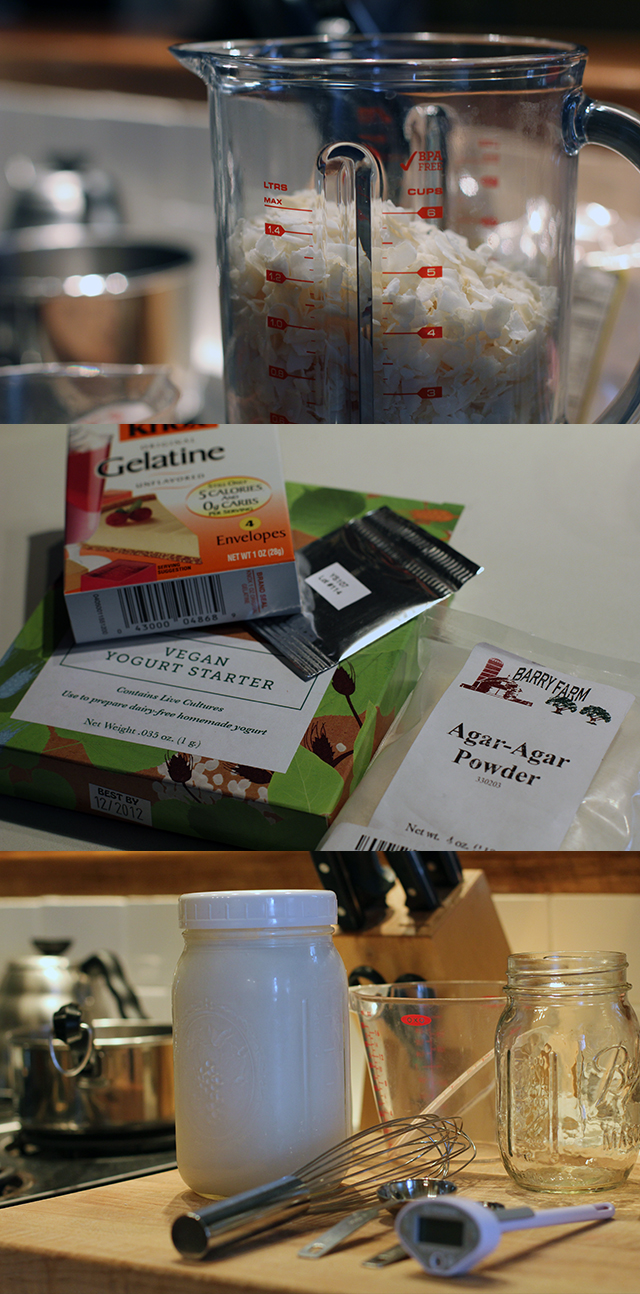
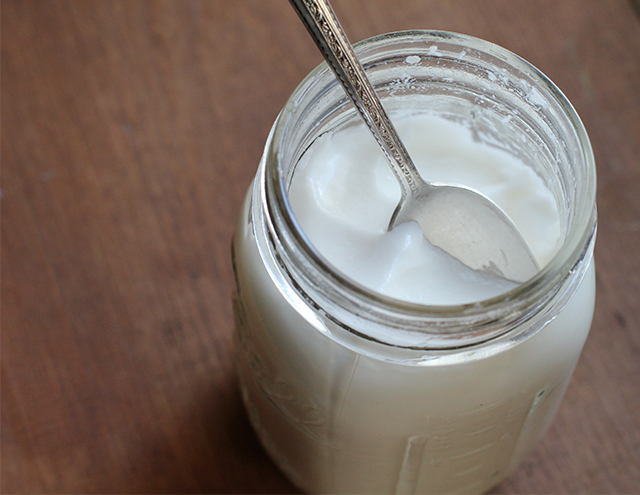
Not All Coconut Milk Is Created Equal: First off, I have found the “milk” sold in those convenient Tetra Paks–often specifically labeled as a “beverage”–to be too watered down to make a good yogurt. Canned is a viable option, and initially I thought I’d go this direction–especially when I thought the idea of “fresh” coconut milk was going to require finding a coconut supplier and a hammer. Ultimately, however, I found that using unsweetened dried coconut flakes provided a workload I could handle while still delivering exceptional taste. It also allowed me to control how much water was added to the milk. The resulting yogurt was fresh and bright, thick enough to hold a spoon but not so gelled that it broke up in my mouth like jello.

Canned: Light vs Regular Coconut Milk: Before I decided to go the (partially) DIY coconut milk route, I tried out both regular and light versions of the canned option. For the record, coconut milk has a high level of saturated fat, and there is much debate over the health risks and benefits of this food. Assessing things purely on taste, I liked the regular well enough, but found the reduced-fat option to have an odd taste, quite chalky with very little hint of actual coconut.

Since the milk was already fortified with some thickeners, I got a solid set with just the addition of 1/2 teaspoon agar agar powder dissolved into a half cup of boiling water to four cups milk. A second batch fortified with two teaspoons of gelatin with the same quantity of milk produced a thinner though tasty yogurt, similar to a kefir. However, canned milk, even full fat, still had a somewhat chalky taste to me, which is why I ultimately settled on making my own milk with coconut flakes.

Dairy-Free Coconut Yogurt: Process

Sweeteners: This is another area where I should have read before I leapt into non-dairy yogurt making. Unlike cow milk, alternatives require additional sugars in order for the cultures to have enough to eat during fermentation. With so many variables already in play, I decided to stick with traditional sugar. Honey and maple syrup also seem to be popular among cooks.

The Verdict:

I was surprised to see that even though the yogurt shelves at my local grocery have exploded in recent years, there were no non-dairy options. At the larger grocery a few miles away, I could pick up a six-ounce cup of coconut yogurt for $1.89. At this same location, I could purchase a bag of thick, high-quality unsweetened coconut flakes (more like chips) for $3.49–enough for six cups of milk (and therefor six cups of yogurt). While that’s not accounting for the other additives in the recipe, some of which require special sourcing, it’s still not close to the $15.12 it would cost to purchase the same quantity commercially. Plus, you’re controlling the ingredient list. Whether this is all ultimately worth the work involved is, of course, only something you can judge.

Coconut Yogurt: Thick and Creamy

I ordered vegan yogurt starter from Cultures for Health. Their website also offers a wealth of advice that I found extremely helpful while experimenting.

DIY Dairy-Free Coconut Yogurt
make approximately four cups

4 cups unsweetened dried coconut flakes
4 1/2 cups water, divided
2 tablespoons sugar
1/2 teaspoon agar agar powder
2 tablespoons tapioca starch
Direct-set vegan yogurt starter

Place dried coconut in blender carafe and add 4 cups just-boiled water. Allow to soak for 30 minutes and then blend on highest speed for two minutes. Set aside until cool enough to handle.

Once cooled, strain through a nut milk bag or fine sieve into bowl. Add sugar and stir to dissolve. If not ready to proceed right away, milk can be stored, covered tightly, in the refrigerator. Otherwise, continue with next step.

Place milk in a saucepan and heat over medium-low flame. Add tapioca starch and whisk until well dissolved. Meanwhile, in a second saucepan, bring 1/2 water to a boil and add agar agar powder. Whisk and simmer until well dissolved, then pour into the heated coconut milk.

Allow to cool, whisking occasionally, to 110°F (check package directions on your starter for alternate instructions/variations). Add starter, whisking again to evenly distribute, and pour milk into a glass container and incubate at 110°F using the method of your choice. (I like the cooler method discussed here.)

When incubation is complete (using the method above, mine took about seven hours), move jar to the refrigerator to chill and halt culturing, at least six hours. Yogurt is now ready to eat.

*

This recipe and post were created for my “DIY vs. Buy” column on Serious Eats.

Choosy Moms Choose DIY (Peanut Butter Edition)

pb_top

Why don’t you just buy it?

Many DIY kitchen projects elicit this reaction, especially once the labor investment is revealed. Even if making your own means the removal of various chemicals, colorings, and preservatives, if it takes you five hours to crack out a bag of perfectly shaped and smiling goldfish crackers, is this a practical application of your time?

There are plenty of DIY projects that aren’t quite so involved, of course. Mayo. Salad dressing. Nut butters also fall into this category, the “recipe” being little more than “put ingredients in food processor and turn on.” Disappointed? I thought not. Even so, you may still be wondering: With so many peanut butter options already fighting for space on grocery store shelves, does it even matter if it takes 15 minutes rather than 15 hours to produce? Why…don’t you just buy it? I’m glad you asked.

Safety: The main reason I even thought to post about DIY-ing your own nut butters was due to the recall of yet another batch of contaminated peanut butter. I put so many more complicated condiments in jars here in Wonderland, it seemed silly not to add this no-brainer to the list.

Control: Peanut butter is one thing, but what about Cashew Almond Butter, or Hazelnut Cocoa Butter? When you DIY, you control type, quality, and quantity of the nuts and oils that go into each and every jar. Salt and sweeteners can be added to suit your tastes and nutrition goals, as well. Now things really start to get interesting.

Cost: When I did the math for Serious Eats, the supplies I was using didn’t dramatically result in cost savings until (perversely) the price comparison climbed into the really pure, “the only thing in that jar is peanuts” kind of $5.99, oil on top spread. To get a pure product and not have to try and figure out how to get the oil reincorporated is worth the homemade time investment as far as I’m concerned, though I did get some colorful tips on how to mix things up.

While considering what type of oil to include in my own DIY version, I wanted to find something that wouldn’t come with environmental concerns and yet still produced an excellent taste and texture. In my experience, using a small amount of coconut oil and then immediately transferring the finished product to the refrigerator results in a butter that holds together without getting oily on top or dry on the bottom before I use it up. I like its texture as well, because it spreads smoothly when totally cold, but isn’t runny on the knife.

DIY Simple Peanut Butter

16 ounces roasted unsalted peanuts
1 tablespoon coconut oil (be sure to use refined oil if a hint of coconut flavor would bother you)
1/2 teaspoon salt or to taste
Honey, agave, or other sweetener to taste (optional)

Place nuts, oil, salt, and sweetener (if using) in the bowl of food processor. Process until nuts break down, stopping occasionally to scrape the sides of the bowl as needed. My food processor likes to fling all the nuts to the sides of the bowl and out of reach of the blades, so I have to invest more time than I’d like scraping them back off until things get going. Using enough nuts to mostly fill up the processor bowl helps alleviate this issue.

DIY Peanut Butter: Processing

Continue to process until peanut butter reaches desired smoothness. Taste and adjust salt and sweetener as needed.

Due to the heat of the processing, the butter should pour easily into a clean container but will achieve a firm yet creamy consistency after chilling. Cover with a tight-fitting lid and store in the refrigerator to prevent separation. (I like Mason jars for this, of course, and am really loving the plastic storage lids)

*

This recipe was created for my “DIY vs. Buy” column on Serious Eats.

Real Deal: DIY Sesame Sticks

ss_top

No trip to the bulk bin area of the supermarket is ever quite complete to me without bagging a few scoops out of the sesame stick container. After so much barley and millet and quinoa has been piled up in my cart, something a little fun and snappy just seems to be in order. I had never even considered making them for myself at home as a result–the whole point of the exercise was that it was a treat–but they seemed like a simple enough thing to whip up in the kitchen once I started to think about it.

And, at the end of the day, they can be more or less a one-bowl-and-stir creation. The shaping is where I got hung up. At first, I thought I could get a dough that would just flow out of the wide nozzle of a pastry gun, but that was a fool’s game. A rolled out and neatly sliced dough was quite tasty when baked up, but the straight-edged rectangles visually said “cracker” to me more than “fun snack!” They just weren’t the little snakes of sesame that my brain recognized and loved. So I picked up a piece of the raw cut dough, rolled it quickly just three times between my palms, and there is was. By the time I had a whole sheet, however, I wondered how much I really cared about the shape. What was so wrong with rectangles, my back protested. So shape them however your tastes demand. Uniformity for even baking is the important thing.

Sesame Sticks: Ingredients

DIY Sesame Sticks
makes about 3 cups

1 cup (5 ounces) whole wheat flour
1/2 cup (2 ounces) toasted sesame seeds
1/4 cup (1 1/2 ounces) cup fine cracked wheat
1/4 teaspoon turmeric
1/4 teaspoon beet root powder
1 teaspoon garlic powder or to taste
1 teaspoon kosher salt or to taste
4 tablespoons vegetable oil
6 tablespoons water

Combine flour, sesame seeds, cracked wheat, turmeric, beet powder, garlic powder, and salt in a medium bowl and whisk thoroughly to combine. In a small bowl, combine water and oil. Stir wet ingredients into dry ingredients. Combine thoroughly, kneading any remaining bits into the dough by hand.

Divide dough in half and wrap each in plastic, flattening into inch-thick squares. Refrigerate for 30 minutes to allow dough to firm up before rolling.

Once dough has chilled, heat oven to 350°F. On a lightly floured surface, roll out dough to 1/8-inch thickness and, using a knife or pizza wheel, cut into small rectangles (approximately 1/4-inch by 3/4-inch). Alternately, roll and cut dough to your desired shape. Uniformity is more important than size to assure even baking.

Sesame Sticks: Shaping

Leave the pieces as they are or roll each one quickly between your palms to form thin rods. Place on parchment-lined baking sheet.

Bake for ten minutes, then flip or roll the pieces around on the sheet so that the bottoms don’t brown. Continue baking 5-8 minutes more, until sticks are crisp but not browning. Remove from oven and cool completely. Store in an airtight container.

*

This recipe was created for my “DIY vs. Buy” column on Serious Eats.

Pretty in Pink Week: Beet Hummus with Finnish Flatbread

beethumus_top

In addition to this being “the week of pink” here in Wonderland, it’s also been a week of dirty butter knives due to the number of spreadable inventions we were working our way through. More asparagus pesto, an addictive smoked salmon spread, the leftover extra-extra garlicy homemade mayo from a variation on these roasted potatoes, plus a fresh batch of the eye-popping beet hummus you see pictured above.

I’ve mentioned this hot pink dip/condiment/sandwich dresser-upper on the site before, but have been especially excited this week to see how well it works stirred into things (mashed potatoes, for one) or smeared over them (whole wheat bread and topped with baby arugula, for two). To make a batch, I tend to just put an adequate eyeballed amount of roasted beet chunks (leftovers put to swift use!), canned or cooked chick peas, tahini, lemon juice, salt, and garlic into the food processor and run it to smooth while drizzling olive oil through the feed tube, large variations totally acceptable depending on pantry inventory. However, if you are the type of cook who likes numbers, I turn you towards this recipe on Not Without Salt.

Of course, these things all required plate-to-mouth delivery vehicles (admittedly, grabbing a spoon and the entire bowl works perfectly well, but we’re trying to keep it civilized) so it seemed like the perfect time to finally take a crack at these Finnish Potato Flatbreads I’d saved to my Pinterest board. I’m still messing with the recipe a bit, as it seems to take me a 450F oven and 25 minute bake time to get adequate browning, but even if I haven’t hit the ideal disc due to too soggy mashed potatoes or some other error, these are a lovely find: a no muss, no fuss addition to my repertoire that I suspect will stick with me. Three batches in, and I’m not tired of them yet.

And so, to review:

Happiness is a big scoop of…

  • Beet Hummus
  • Asparagus Pesto If you don’t have spinach, arugula is tasty too. I like a combo and plan to also add a bit of basil to the next batch. For nuts, I used up my pecans and walnuts and was not disappointed. Pistachios are excellent as well.
  • Smoked Salmon Spread I bought this amazing fish from Neopol at the Waverly Farmer’s market, but they also have a retail outlet in North Baltimore.

Serve these treats with the crackers, breads, or crudites of your choice. Cauliflower would provide some bonus beet visual drama, I suspect. We ate ours on…

Things in Jars

I fear @briansacawa will soon stage a "no more jars" intervention for me.