eat me » Wonderland Kitchen
Browsing Category

eat me

The Returned: How to Cook a Wolf

Tomato Soup Cake from How to Cook a Wolf

If I’m making amends for the sins of abandonment committed against my cookbooks here, it seems extra appropriate to do right by a book that isn’t even actually mine but rather one I borrowed from a neighbor and then proceeded to bury under an ever-growing pile of unread Lucky Peach issues. (Okay, I have a problem. We’ve clearly established that at this point.)

If you’re unfamiliar, How to Cook a Wolf (published originally in 1942) is a quick read, part rallying cry and part cookbook designed to aid and inspire home cooks in a time of stress and limitation. When I started the book, I was immediately struck by how much the ideas M.F.K. Fisher had about economics, nutrition, and making do had to say (adjusting for inflation and accounting for the proximity of war) to me sitting in my living room arm chair in 2014. My appreciation for her outlook only grew as the pages turned, as did my trust in her advice and appraisals after acknowledgements such as this one, crediting her sources for a “Cream of Potato Soup” that follows a bit of a tirade on doing things “correctly” vs. “eating according to your own tastes.”

However, there are compromises that can be admitted, whether you approve of them or not. Here is a recipe, a combination really of Escoffier’s Soupe à la Bonne Femme and one I found in a calendar published by the gas company in the Canton of Vaud in Switzerland.

Hear, hear! That’s a world-aware outlook and a flexibility of approach I can get behind. (It’s also probably why I can’t really hang with the Cook’s Illustrated folks, but that’s a convo for another post.)

Canned Tomato Soup

Think of it as adding a little Warhol pizzazz to your baking?

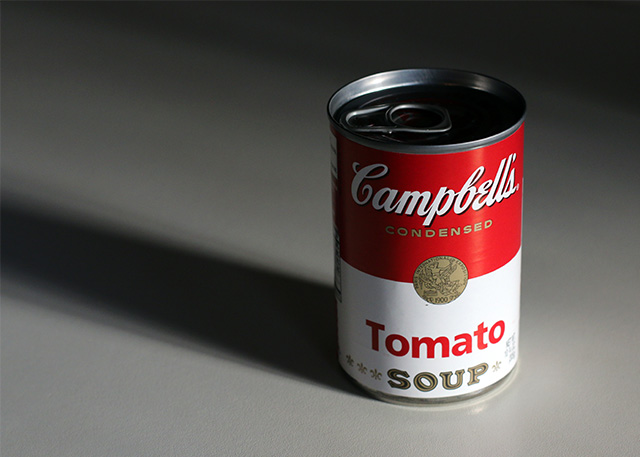
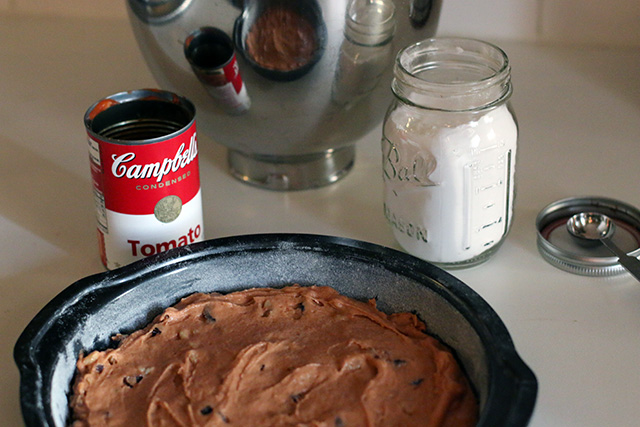
I’m personally satisfied to report that I have now finished the book and returned it to its rightful owner, along with a portion of a cake from its pages that I just had to try out: Tomato Soup Cake. Also known as Mystery or Conversation Cake due to its surprising secret ingredient (which I doubt any taste tester would be able to ID), this is one of those recipes that seems to trace back for a lot of people to grandma’s special version and holiday family gatherings (and probably an advertising pamphlet produced by Campbell’s Soup!). It’s a spice cake that uses no eggs and only three tablespoons of fat, making it easy on the pantry and easily vegan to boot. You can dress it up with the mix-ins and spice combinations that best suit your guests and top it (maple cream cheese frosting, anyone?) however you like. I’ve included my version below, but as Fisher says, you should make yours “to you own tastes!”

Tomato Soup Cake: Ready to Bake

Tomato Soup Cake
from How to Cook a Wolf

3 tablespoons shortening (or butter)
1 cup sugar
1 can condensed tomato soup
1 teaspoon baking soda
2 cups AP flour
1 teaspoon cinnamon
1 teaspoon mixed spice (I used 1/4 teaspoon of each of the following: ginger, allspice, cloves, and nutmeg.)
1 1/2 cups nuts and fruit, roughly chopped (I used 1/2 cup of each of the following: raisins, walnuts, and dates.)

Optional topping:
3 tablespoons powdered sugar dusted over top

Heat oven to 325°F. Butter and flour a 9-inch cake pan (line bottom with parchment if you are extra nervous about cake removal—I did and don’t regret it, but it was perhaps overkill for a cake of this texture). Set aside.

Measure flour and spices into a medium bowl and whisk to combine. Set aside.

Using a hand or stand mixer, cream shortening and sugar together until well blended and fluffy.

Stir baking soda into the soup and mix well. Add this and the flour/spice mixture to the creamed sugar in several alternating portions, mixing until fully incorporated. Fold in nuts and fruit.

Spoon into the prepared cake pan and smooth the top (batter will be quite thick). Bake for 45 minutes, or until a cake tester inserted into the center comes out clean. Cool for ten minutes in the pan and then turn out onto a wire rack to cool completely.

Top as desired.

Cake stores well and pleased even my non-spice-cake-liking friends, for what it’s worth.

Tomato Soup Cake from How to Cook a Wolf

The Countdown: The Beekman 1802 Heirloom Dessert Cookbook

Malted Milk Chocolate Cake

In Wonderland Kitchen, recipe research almost always equals Google searches and Evernote-taking. I rarely crack an actual, physical cookbook when looking for knowledge and inspiration, and yet I cannot seem to stop buying them! And those that don’t arrive on my doorstep via UPS show up skillfully wrapped in the hands of generous friends or as orphan cast-offs schlepped home from some musty church basement book sale.

Now, here they all sit in precarious stacks around my office, their beseeching gaze rivaled only by the CDs I have yet to split the cellophane on and review for work.

And so, as a 2014 self-improvement project that does not require public exercise, I’m on a mission to review each book in turn, to sit down and get to know it a little, and select a recipe which I will make and share here with my kitchen crew. Which is to say I’ll be doing this for me, but hopefully you’ll get something out of it, too.

Real world cookbooks present challenges

Real world cookbooks present challenges

I’m starting out with The Beekman 1802 Heirloom Dessert Cookbook. Now, this is honestly a very lovely book featuring beautiful but not-too-precious photographs and charming writing. But while I follow their blog, lust after their farm house, and appreciate a balanced collection that won’t break my toe if it slides off the counter, really it’s leading out of the gate because my awesome mother-in-law gave me an autographed copy for my birthday and I still haven’t made anything from it!!!

…Ahem.

Baking pan ready for action

Now then, this is one of those books helpfully (if you’re into that kind of thing) arranged by season, starting with winter and a cozy list of baking projects. Though the recipe for “Snow Cream with Sweetened Condensed Milk” was tempting, I’m not sure that there’s any snow in Baltimore I’d feel safe serving to guests. As I paged through my options, I did appreciate that the desserts each seemed possible to execute without a professional pastry chef on stand by. A few of the recipes included commercial candy, which is not something I’d ever considered, and so usually being all DIY and kale and whatnot, I decided this was the way to go. Malted Milk Chocolate Cake: come to mama!

The cake came together just as easily as the one-page recipe implied, and the 9×13-inch pan serving 12-16 is no joke—this is a homey yet decadent chocolate cake-brownie of a treat, so you may want to keep your pieces quite small. I didn’t find it dry in the least, but offering coffee or a tall glass of milk to balance out the richness would not be amiss.

Malted Milk Chocolate Cake: Unbaked

Malted Milk Chocolate Cake
from The Beekman 1802 Heirloom Dessert Cookbook

1 1/3 cups whole milk
1/2 cup malted milk powder (I could only find chocolate flavored, and just went for it)
1 1/2 teaspoons vanilla extract

1 3/4 cups AP flour
1 cup unsweetened cocoa powder
2 teaspoons baking powder
1 teaspoon baking soda
1/2 teaspoon salt

8 ounces unsalted butter, room temperature
1 cup sugar
1 cup packed light brown sugar
4 large eggs, room temperature

1 cup coarsely chopped malted milk balls
(If you can promise not to eat more than three balls before baking, you can buy the 5 oz box. All others might want to consider purchasing more. I roughly halved the milk balls and just gave the pile an extra whack or two at the end for minimal rolling-to-the-floor.)

Butter a 9×13-inch cake pan and line the bottom with parchment. Butter the paper as well and flour the pan. Set aside.

Heat the oven to 350°F.

Measure out the milk and add the malted milk powder and the vanilla. Stir to combine.

Into a medium bowl, measure out the flour, cocoa powder, baking powder, baking soda, and salt. Run a whisk around the bowl several times until evenly incorporated. Set aside.

Using a hand or stand mixer, cream together the butter and sugars on medium until fluffy. Add the eggs one at a time, thoroughly mixing in each addition and scraping down the bowl as needed. Lower the mixer speed and add the remaining dry (excepting the milk balls) and liquid ingredients in several alternating portions, starting and ending with the dry. Scrape down the mixing bowl and make sure all the ingredients have been evenly incorporated. (I failed a little here–learn from my mistakes!!)

Pour the cake batter into the prepared baking pan and even out. Sprinkle the milk balls across the top.

Bake for about 40 minutes, until a cake tester (I’ve been loving using left over kabob skewers for this) comes out clean and the cake pulls away from the pan edge.

Cool completely on a wire rack. Cake can be served from and stored in the pan.

Malted Milk Chocolate Cake

Under Construction

under construction

I have largely stopped doing things that scare me, and over the last few months I have found that (irony alert!) quietly terrifying. I realize that this is, by its very nature, a problem of a privileged person, so there is definitely an important element of perspective and awareness that needs to be ** here. Still, after living in an environment of non-challenge and change, I am way past due to actually take responsibility for the situation. Now, there will probably be some closer-to-home solutions to this that will ultimately carry more weight and meaning in the long run, but as a personal jump start (think Cher slapping some sense into Nicholas Cage in Moonstruck) I am off on a little travel adventure for the next couple of weeks: to chat with and learn from people I’ve known for ages, people I have only known on the internet, and people I just haven’t met quite yet. I’m going to spend a lot of time on Amtrak trains. I’m going to see parts of the country I’ve never seen before and learn something about public transportation in four new-to-me metropolitan areas. I’m going to get terrifically lost. I’m going to try not to cry in any public restrooms, but no promises!

horoscope 2014

The 2014 tarot cards suggested a challenging year ahead. Guess this is my
way of going out on the field to meet it.

Meanwhile, I have been running some small-scale, totally safe experiments here at home that I thought I might share as a “getting off on the right foot” send off. First up, this terrific stitch from the Purl Soho blog. (I want to cast on pretty much every pattern they post, and have even picked out a new project to take along on my trip.) The finished look of this slip-stitch pattern is almost a kind of woven material, at least more than any traditional knitting I have ever seen. It’s not terribly complicated once you get the rhythm down, but will take a bit of time to complete—a.k.a. consider starting next year’s xmas scarf gifts now!

woven knits

I have no actual expertise in natural remedies, but I sure do love reading about the possibilities. When the husband was feeling flu-ish and asked if I had any “potions” to help him out, my research led me to elderberry syrup. Considering there were even some studies/scientific evidence for its usefulness posted on WebMD, I decided to try it out. Not being a controlled experiment, I can’t say it worked…but with both of us nearly down for the count and then quickly back on our feet, it didn’t not work.

elderberry syrup

And finally, the polar vortex and the general unrelenting darkness of this time of the season weighing hard, something bright and healthy to eat seemed to be called for. Cauliflower is one of the only banned vegetables around this homestead but, as a result, those alterna-pizza crusts fare poorly in these parts. However, this butternut squash version (with a kale pesto instead of spinach and whatever toppings I can dig out of the fridge) is sure to be a repeat order.

Just Like Candy: #DIY Mixed Peel

DIY Mixed Peel at Wonderland Kitchen

On days like today, Google makes me cry for both confusingly uplifting reasons as well as the terrifying visions of the future its actions conjure in my head. But while this best-indie-movie plot line and/or Kafka tale develops, Google’s search engine reliably solves my problems. The latest: What the hell is mixed peel?

I went hunting with the goal of making this Alice in Wonderland-related Looking Glass cake. However, mixed peel not being an ingredient stocked at my local grocery, before the baking could begin it seemed I would need to DIY a key ingredient. The internet to the rescue, I was in business with a pile of citrus and a Googled recipe.

DIY Mixed Peel at Wonderland Kitchen

DIY Mixed Peel at Wonderland Kitchen

DIY Mixed Peel at Wonderland Kitchen

This is one of those super easy but several-day DIY projects that annoy the spontaneous among us. So make it now and then surprise yourself when you want to bake hot cross buns for Easter! (Note to self: Bake hot cross buns for Easter this year.) If you have the patience to cut up citrus peel and the skill to boil water, you are already pretty much done. Holiday goodies will definitely be kicked up a notch this season. (So yes, family, prepare for Wonderland fruit cakes this Christmas.) Anyway…

DIY Mixed Peel at Wonderland Kitchen

DIY Mixed Peel
Recipe via Best Recipes, desire due to The Alice in Wonderland Cookbook: A Culinary Diversion by John Fisher

Note: The original recipe calls for less fruit. I lived dangerously and added an extra lemon and one more orange. I was well pleased with the result, but be advised.

1 grapefruit
2 oranges
2 lemons
(or citrus combo of your choosing)
1 1/2 cups sugar

Peel citrus fruit, including as much of the pith as possible. Slice peels into approximately 1/4-inch pieces.

Place prepared citrus peel in a sauce pan and just cover with water. Bring to a boil and simmer for ten minutes. Drain and repeat, this time reserving 1/2 cup of the simmering liquid before draining.

Return boiled peel, 1/2 cup reserved liquid, 1/2 cup fresh water, and 1 cup sugar to sauce pan and stir to dissolve sugar while bringing to a boil. Remove from heat, cover, and let sit overnight (mine sat about 18 hours). The following day, add an additional 1/2 cup sugar and bring to a boil. Simmer for 15 minutes and then drain citrus peel thoroughly.

Line a baking sheet with parchment and spread out peel pieces to dry, tossing occasionally to prevent clumping. When peels are no longer wet (probably another 24 hours), place in a container with a tight-fitting lid and store in the refrigerator (or the freezer for a longer shelf life). According to my reading, prepared peels will withstand at least a month in the fridge.

Mad Hatter Tea Party: Not Too Dry Tea Biscuits

Not Too Dry Tea Biscuits

You may have noticed something of an overarching theme in this site’s construction, but while Alice in Wonderland comes up here and there, I have yet to post any recipes for roasting Jabberwocky or to offer any advice on adding pepper to soups.

That being said, when I came across this now out-of-print cookbook riffing on the classic tale, it seemed like a match I surely could not ignore. It was easier to ignore it once I caught the triple-digit price tag on existing copies, however. Still, even while I waited for a version more within my budget, there were a few treats from the book posted online, so I decided to see where that rabbit hole would lead.

Not Too Dry Tea Biscuits: Tray

Whether you’re plotting a grand tea party for six or it’s just you and your cat, the recipe for these Very Dry Tea Biscuits is simple enough to whip up any time. No worries. As long as you don’t over-bake them, they are not too dry at all, neither are they terribly sweet, though bright hints of lemon and the rich scent of nutmeg accent them beautifully. This recipe turned out about 40 two-inch biscuits for me, and they store perfectly in the freezer. I like having them on hand to pull out at a moments notice when curious guests suddenly arrive and are in need of snacks.

Now that I’ve had a taste of Wonderland cooking, I must admit that roasting Jabberwocky sounds kind of intriguing. Maybe we’ll have to follow this white rabbit a bit more often.

Not Too Dry Tea Biscuits: Process

Not Too Dry Tea Biscuits
from The Alice in Wonderland Cookbook: A Culinary Diversion by John Fisher

1 stick butter, room temperature
1/3 cup sugar
1 egg, lightly beaten
8 ounces flour
2 teaspoons lemon zest
a pinch of salt
a very generous scratch of nutmeg
2 tablespoons milk, as needed

Heat oven to 325°F

In a medium bowl, measure out flour. Add lemon zest, salt, and nutmeg and whisk to combine.

Cream together butter and sugar until light and fluffy. Scrape down the sides of the bowl, add egg, and continue mixing until incorporated. By hand, stir in mixture of flour, lemon zest, salt, and nutmeg. If dough remains too dry, add just enough milk to pull it together.

Roll out dough on lightly floured counter and cut out desired shapes. Place each biscuit on a parchment covered cookie sheet (you can squeeze them fairly close–they will not spread much) and prick each with a fork. Bake 14-16 minutes, or until lightly browned.

Cool completely on a wire rack. Store tightly covered (in the freezer for an even longer shelf life).

Having My (Double Chocolate) Cake (and Nibbling at the Edges)

Double Chocolate Muffins

I mentioned that it might be a little quiet in Wonderland this summer, but even I wasn’t expecting the silence to be so drawn out. And the longer the gap, the harder the re-start. I have a small stack of draft posts, but I haven’t been quite sure how to put what was holding me back into words even for myself. Today, it was put into pictures with way more power that I ever could have generated.

That’s not to imply that I have lost interest in researching or testing recipes, writing about or photographing meals (and eating remains a central priority in my daily life, one way or another). There is something so energizing about sharing food with friends and family around the table; the fact that in 2013 you can tweet a quick picture of that meal to a recipe creator and invite them in for a virtual “thank you” bite is a very sweet icing indeed.

While I’m nowhere near as serious as some, I find blogging to be a beautiful final step in documenting what was once ephemeral women’s work. For me, however, it often comes at a cost in lost attention to the present.

With that in mind, I’ve dedicated myself (unconsciously at first, I’ll admit) to being a consumer of internet knowledge this past month rather than a contributor to the volume, and it’s been grand. I’ve actually finally made a lot of the dishes on my “To Try” Pinterest board! Here’s a round up of some of my new DIY discoveries and recipes. Yes, I fully grasp the ridiculousness of expressing anxiety about the volume of internet content in a new post published on the internet. It’s hard to let go of the dopamine hit that is online (over?)sharing, for sure.

Wonderland on Instagram (clockwise from top left): citronella soy candles; natural lipstick; cocoa butter lotion bars; double chocolate muffins.

Wonderland on Instagram (clockwise from top left): citronella soy candles; natural lipstick; cocoa butter lotion bars; pre-bake double chocolate muffins.

I’ve also turned the kitchen over to crafting some DIY beauty products. While I recently figured out that my body is much too irritated by the baking soda in this deodorant recipe (who knew?), I’m loving these other Wellness Mama concoctions:

While you’re at it, take a second to make a little olive oil candle scented with the essential oils of your choice to keep you company in the bath. I rigged this wick with a bit of picture frame wire.

evoo candle

Now that I’m almost all the way back on this pony, more on other projects, such as DIY bug spray and citronella soy candle making to come…