
With a holiday weekend on the horizon and rising temperatures (at least in the Mid-Atlantic) hinting at the swamp, I mean, summer ahead, it seemed like a prime time to revisit the seltzer maker I built for the kitchen almost three (yikes!) years back. If you’re the tl;dr type, the sum up is that it still rocks. You may proceed to the directions to construct your very own.
To be clear, I in no way invented this mad scientist contraption. Rather, at a time when the family recycling bin was overflowing with plastic one-liter bottles–my legs sore from carting them home and my stomach clenching over the packaging waste–I started digging around to see what my make-at-home options might be. Even back then, the SodaStream was a thing. But it was an expensive thing, with what seemed to be a high ongoing fee for the specialty CO2 cylinders it required. However, as with many problems, if you’re willing to get a little weird, the internet will provide. That’s how I ended up with this:
Truth be told, I’m not sure if I would have proceeded were it not for the fact that my dad has sold welding and gas supplies since I was a kid. (One of my favorite toys looked something like this mask, which probably explains more than a few things about me.) As a result, none of the necessary items were all that foreign to my eye and, while I admittedly carbonated my first bottle in the backyard a safe distance from the house just in case anything exploded, I was reasonably confident that I knew what I was doing. I asked my dad if this all seemed okay. He was also reasonably confident. The internet said it would be fine. And it was! Many, many bottles later, I haven’t had a single mishap.
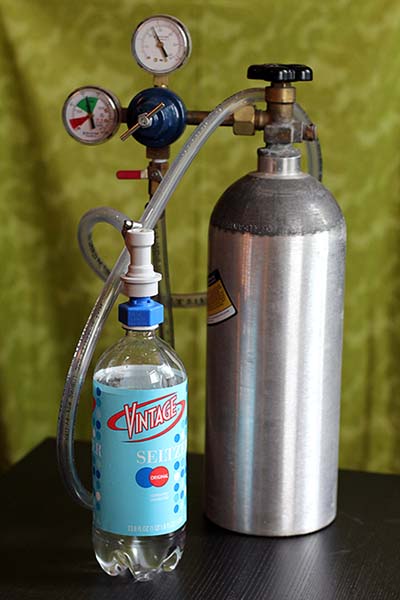
To build the carbonation machine, you will need:
- 5lb CO2 cylinder, or a size to suit your needs (if you know beer brewers, ask around and see if anyone if looking to get rid of one cheap)
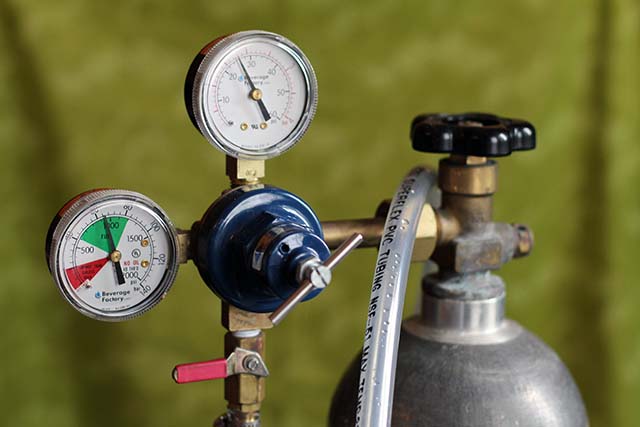
- Dual gauge regulator that can be set to deliver 20-50 psi
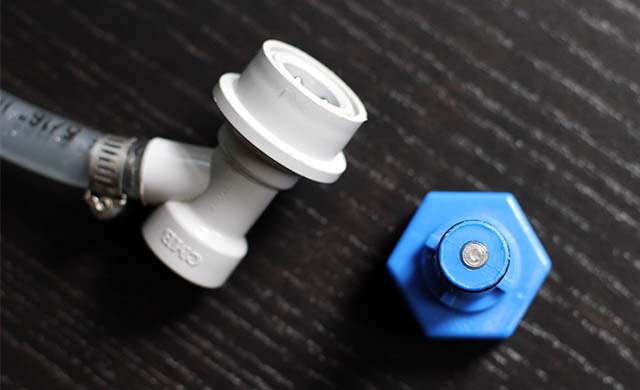
- Flexible polyethylene tubing (4ft), 2 hose clamps, and a gas ball lock quick disconnect (now conveniently sold by Amazon as a single item)
- Carbonater cap
NOTE: I tried assembling my own carbonater cap out of a tire stem as suggested (also by the internet), but could not get rid of the “just purchased from AutoZone!” smell, no matter what I washed or soaked it in. Possibly not a big deal in the long run, but the $12 carbonater cap I purchased has made scentless work of it for years and seems to have earned its keep just fine.
You will also need to upcycle at least one plastic bottle in very good condition. I steal new bottles from friends’ recycling bins when they are not looking in order to replace my bottles every few months, but you’ll definitely want to swap them out if you notice any visible wear.
Now, I’ve never used a SodaStream myself, but I’m willing to bet the look of the machine and the process of making the fizzy water is a little classier. Still, I have to say, with one of these babies in the kitchen, it’s automatic house party conversation material!

To carbonate water:
Fill the plastic bottle with water 7/8 full (I go to the top of where the label is) and chill. Very cold water is important for better CO2 absorption.
When cold, squeeze air out of the bottle and screw on carbonater cap.

Attach quick disconnect to the carbonater cap. Check to make sure the output valve on your regulator is completely closed. Turn on the gas and check/adjust the psi to suit your needs. I do mine at about 25 psi, but others go higher.
Holding tightly to your bottle in one hand, slowly open the output valve. The bottle will fill with gas. Shake the bottle vigorously for about 10-20 seconds.
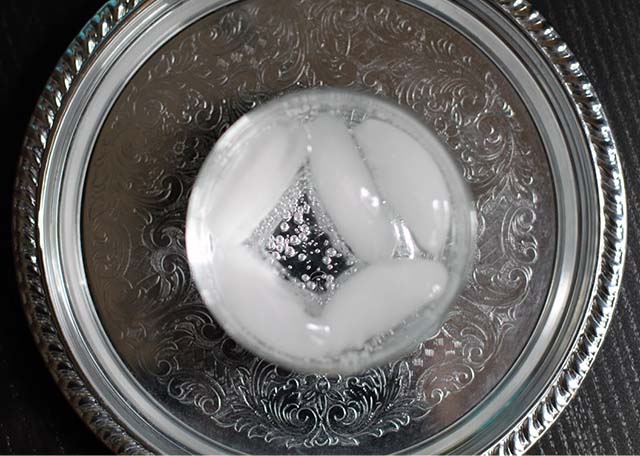
Shut off the CO2 and close the output valve. Disconnect the bottle from the hose and refrigerate for at least several hours before removing the carbonater cap. (Unless, of course, you are looking to demonstrate a volcano eruption for the kids!)
The Verdict
The total cost of the unit, if all pieces are purchased brand new via Amazon, is $134.66. Plus you need to fill the tank. Locally, that cost me $15. I admit that the grand total can be something of a shock, but ask around and you just might be able to get some of these things for much cheaper.
Research indicates that I should be able to get about 280 one-liter bottles per tank. We have definitely had our runs of two-bottle-a-day consumption, and then a month without a single bottle made, but after what I swear are hundreds of bottles, we’re still on the same tank. I carbonate at a lower psi, so perhaps that bridges the gap. In any event, I’m cruising in on three years of stress-free, last-minute, in-home seltzer. I consider that a real coup, and a conversation piece to boot!


")


")


You are officially the coolest person I almost know.
Aww, thanks, darlin’. You can’t see it from there, but I am blushing.
Nice! I remember the kids on my honours student accommodation doing this one night in the kitchen, but I never thought I’d see it on a food blog. Thanks for sharing :) I’m always a sucker for kitchen geekiness!
Me too! Too many hours watching Mr. Wizard, perhaps…
AWESOME I HAVE BEEN DOING THIS FOR YEARS WITH TIRE VALVE JUST SWITCHED TO CARBONATOR CAP WORKS GREAT YOU ROCK I CANT BELIEVE EVERYONE IS NOT DOING THIS
Wonderful Idea !
Question: I have recipes for homemade gingerale, rootbeer etc. Do you think I could use this to make them carbonated ? OR would that be dangerous ?
Hey Laurie. If you’re starting with any non-carbonated beverage, you should be fine. Make sure it’s cold, and then I would just be mindful of any stickiness on the cap and quick disconnect when carbonating sugary drinks.